
Here is a quick diagram I mocked up to detail exactly how video routing works in the studio.

Here is a quick diagram I mocked up to detail exactly how video routing works in the studio.
My music acquisition process for DJ music:
Every year towards the end of the year, I put together a retrospective of events that have happened over the year – the good, bad and the ugly.


I’ve been having online guitar lessons with my friend Jon.
After a while we have got things down to a setup that seems to work remotely.
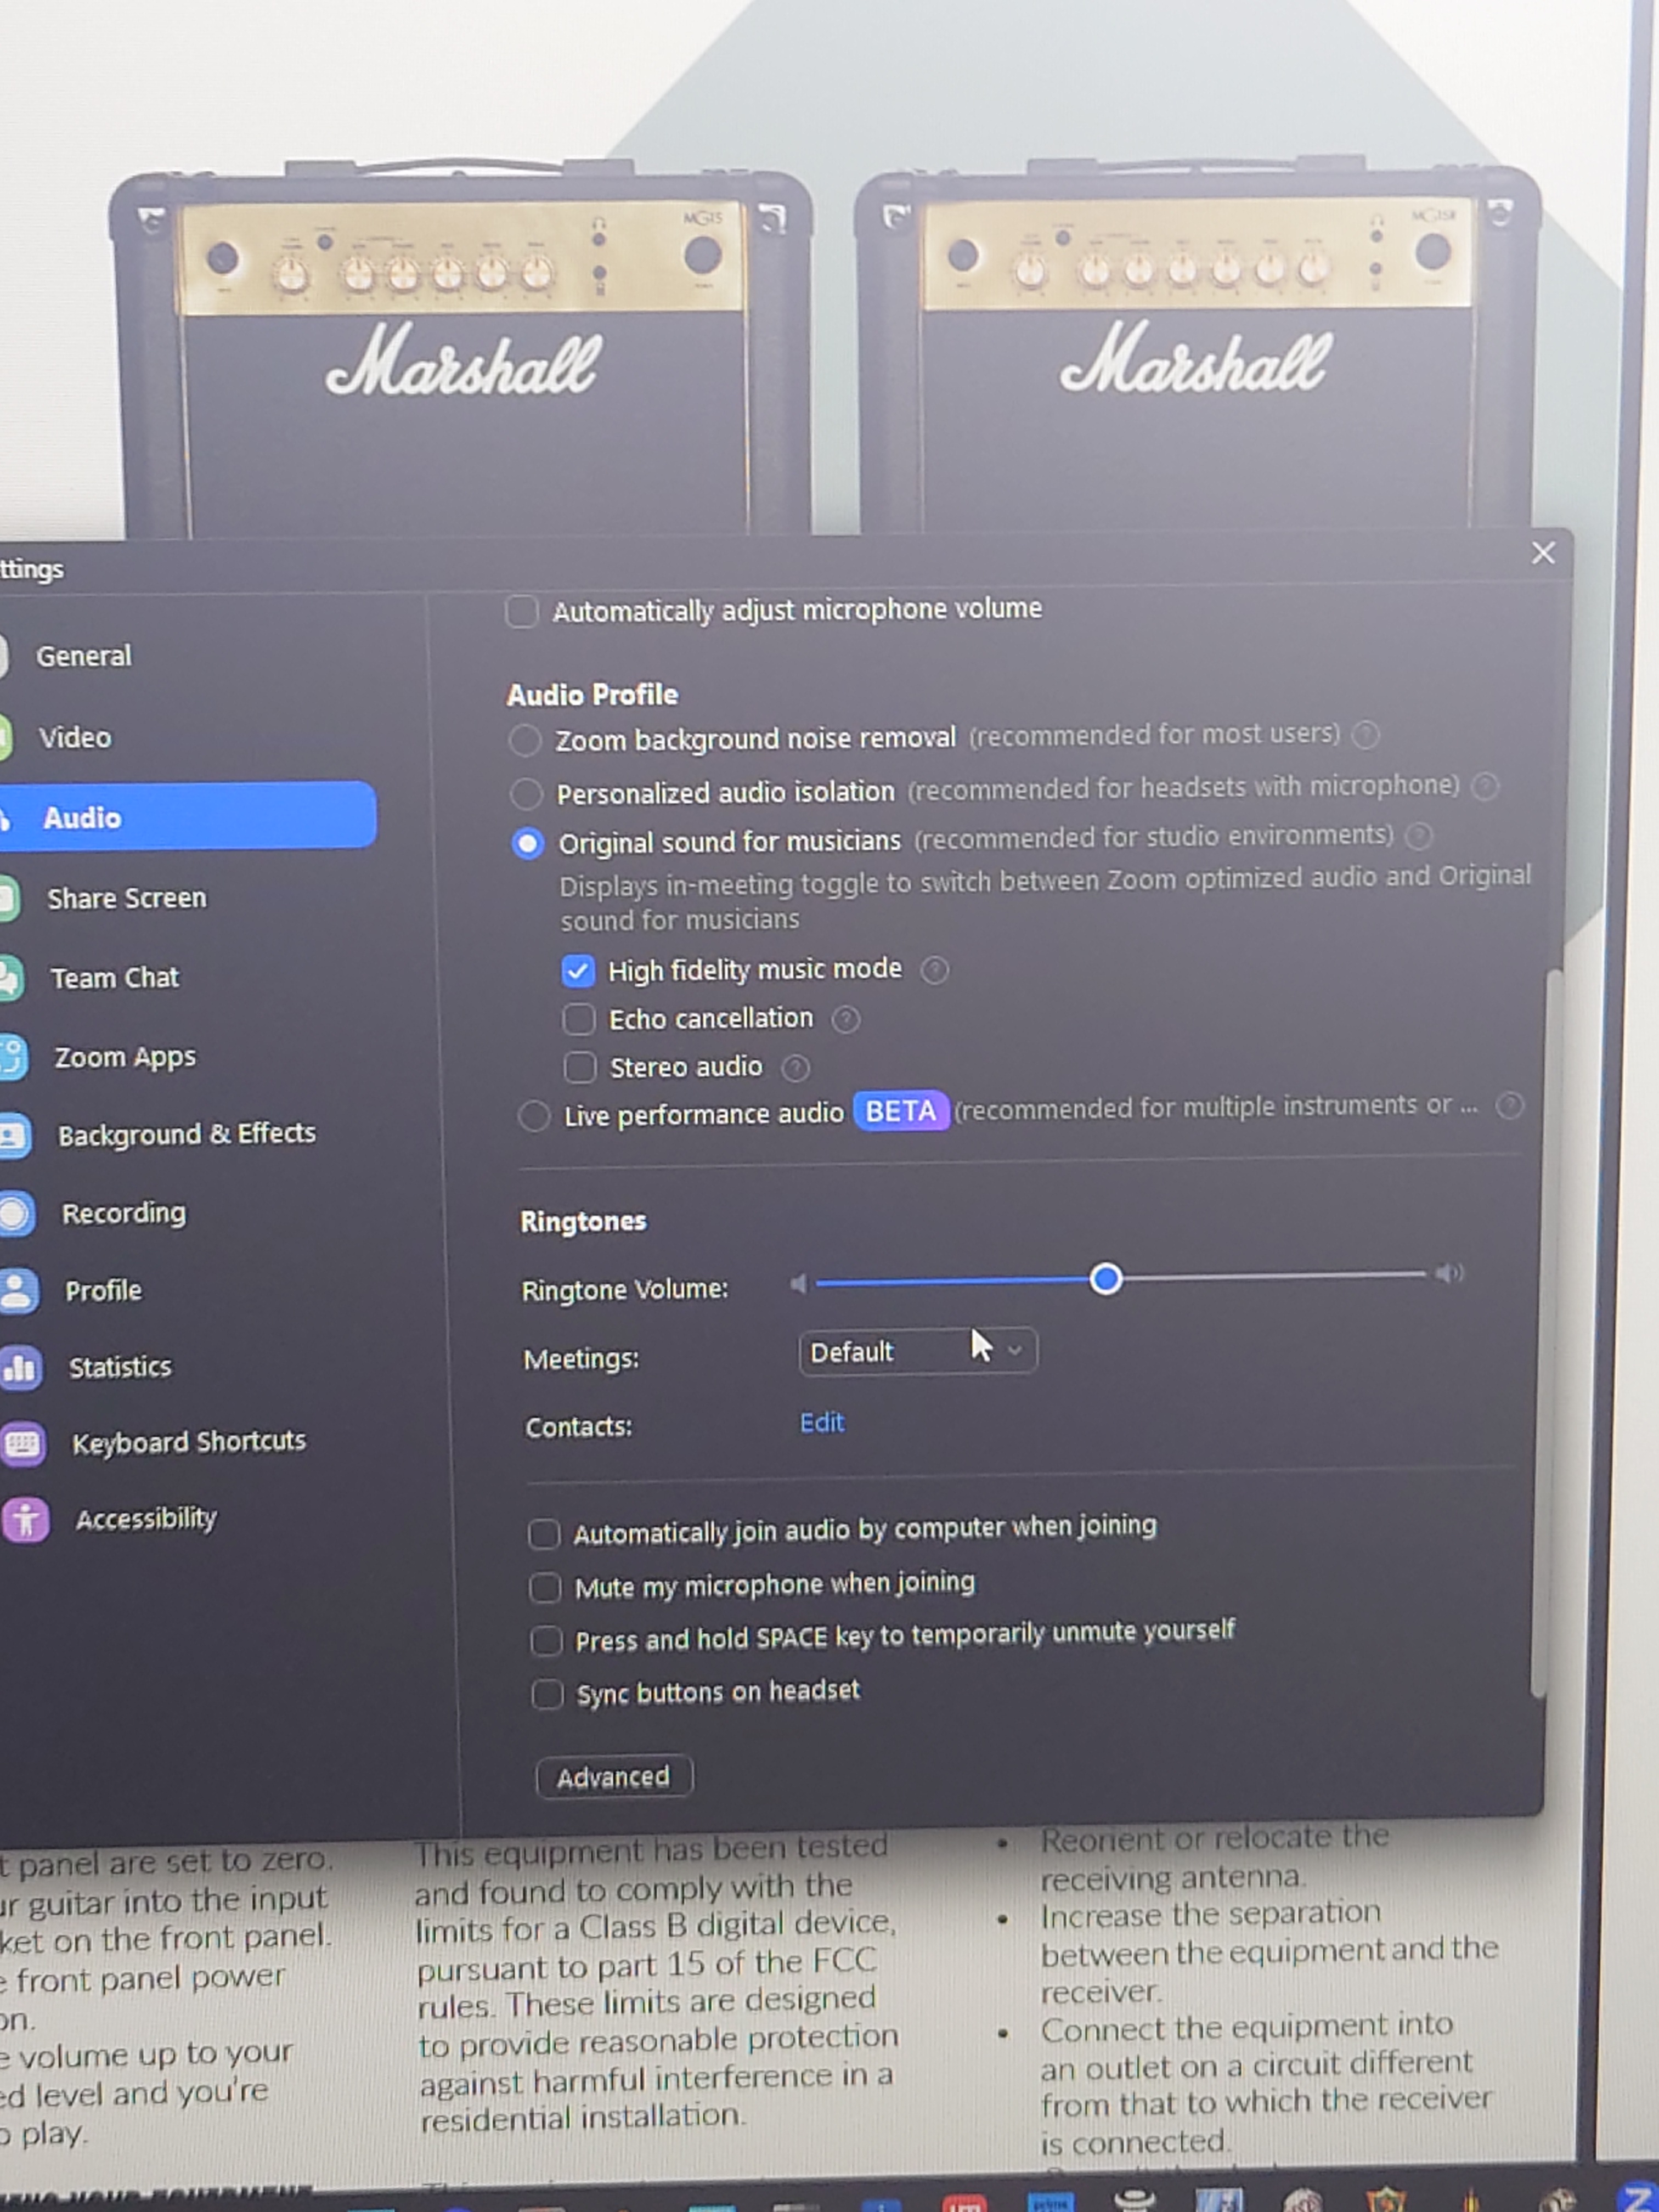
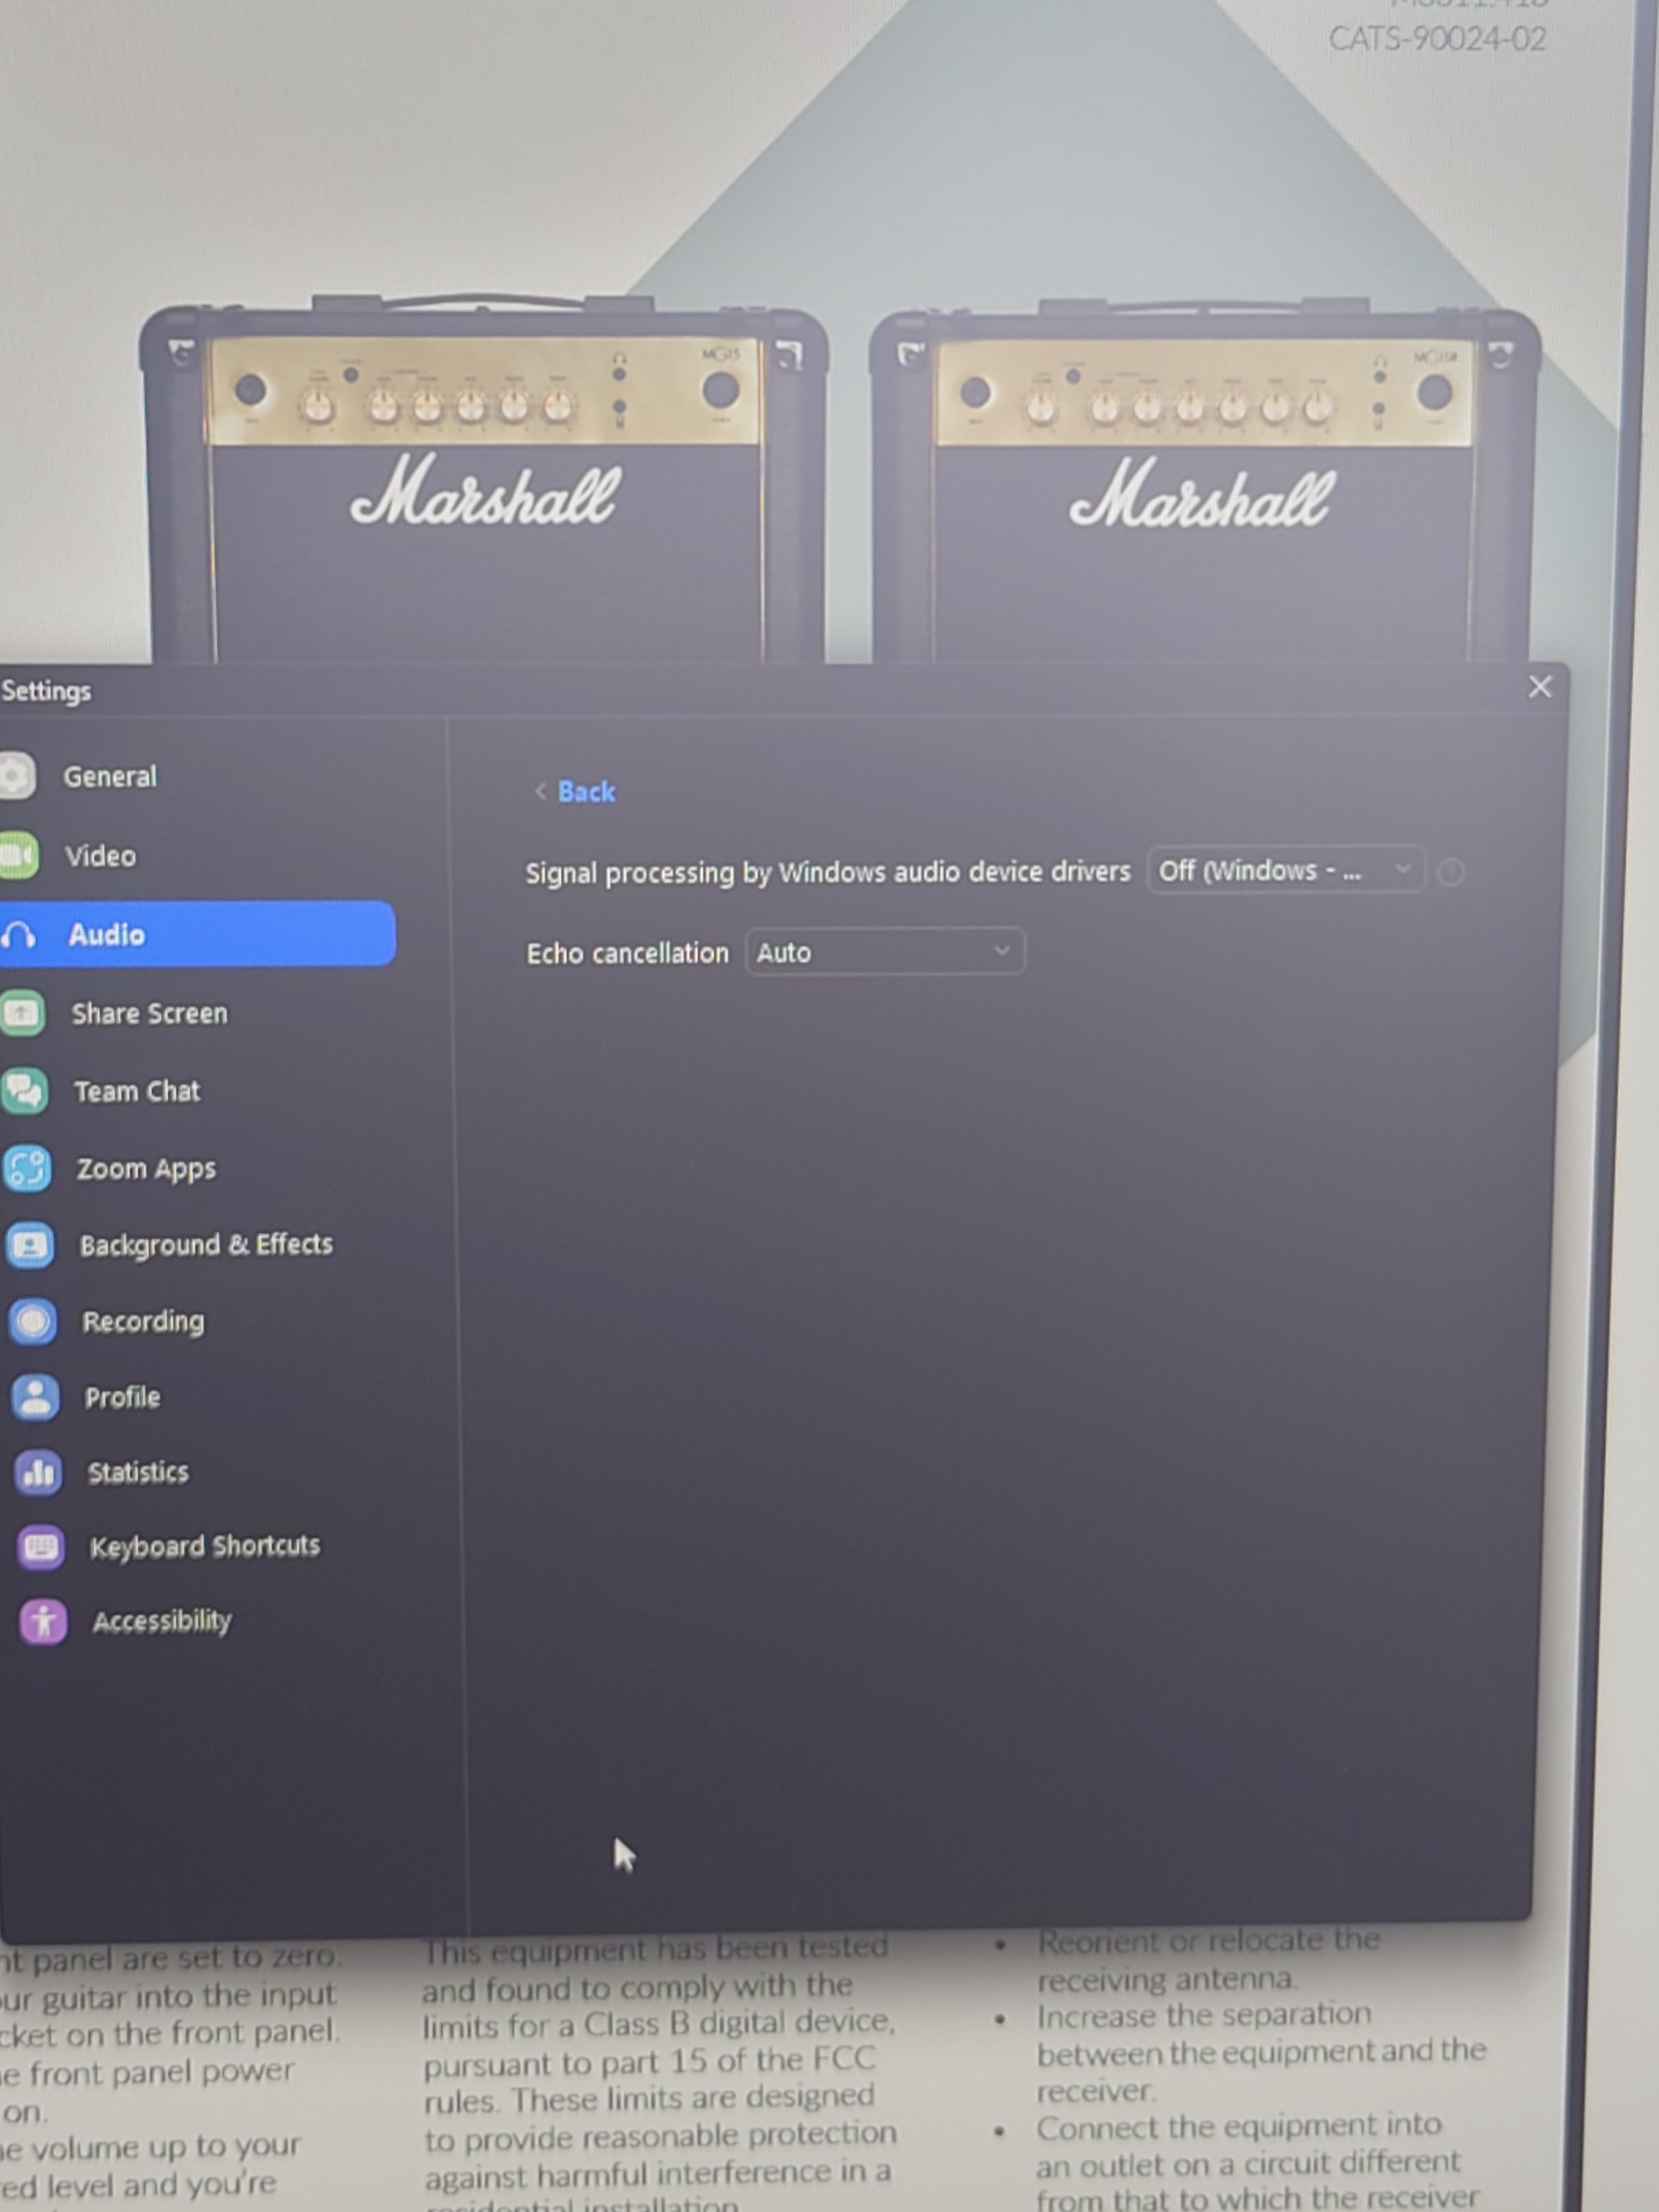
This is the Zoom configuration options that I use. Currently I do not turn on the ‘original audio for musicians’ toggle when on the call:


These are the settings I use on my guitar interface and the Marshall amp for optimium sound.
The left channel (purple cable) is the microphone, and right is the guitar amp.
Both volumes are set to max.
Pad and instrument (phono) are both ON on the microphone channel, and both OFF on the guitar amp channel.
I also have ‘Stereo audio’ setup on the sound interface, and ‘Mono Audio’ setup on the windows sound settings, so it combines both channels into one.


On the guitar, the switch is set to ‘treble’, the volume set to 10, and the distortion set to 0.
This is a small face-on camera that sits on the top of my monitor for showing my face on the call. It is a Logitech C270 camera and does not have a wide range of view.
It can be plugged into my USB hub with no problem usually.
It should be centered and the monitor lowered so that my face is in full view.


This is a wide angle logitech C920 that I use for showing the fingering and technique when I am playing guitar. I have it on a lighting boom which I also use for my DJ streaming setup so it is quite easy to move around.
It should be plugged directly into the laptop I’m using for the call as the USB hub and USB KVM does not have enough additional bandwidth to handle it. I have a USB 3 extension cable for it.


I use my Lumie Brazil S.A.D. lamp to flood my room with white light to improve the visuals for the camera, but really any bright white light source (not yellow) would achieve this.

If you are still using optical discs, e.g. CDs or Blu-rays, in music, video or games, then you are in the minority these days. Downloads and streaming have become the norm, which means 1) A lot less discs are being produced 2) A lot less optical drives are being produced.
Because a lot less optical drives are being produced, we can imagine a time in the future when the only optical drives you can buy, are second-hand. Regardless if you can buy new optical drives currently or not, often the best value/quality ratio can be found in second-hand optical drives.
But, the problem with second-hand optical drives is that they often have been heavily used, and are dirty. This is where optical drive cleaners come in.
Also, if you have a 5.1 surround system, or a complex audio/video sound setup of any type, then you can benefit from the tests and tools included on these discs. I found, for example, that even on my 2.0 stereo setup, my system was ‘out of phase’ when using my CD cleaner, and figuring that out REALLY helped the quality of my sound setup!
So yes, they are a good thing to have, and they are quite cheap, compared to the cost of buying a brand new optical drive anyway, or a new sound system!
These are the ones I use:
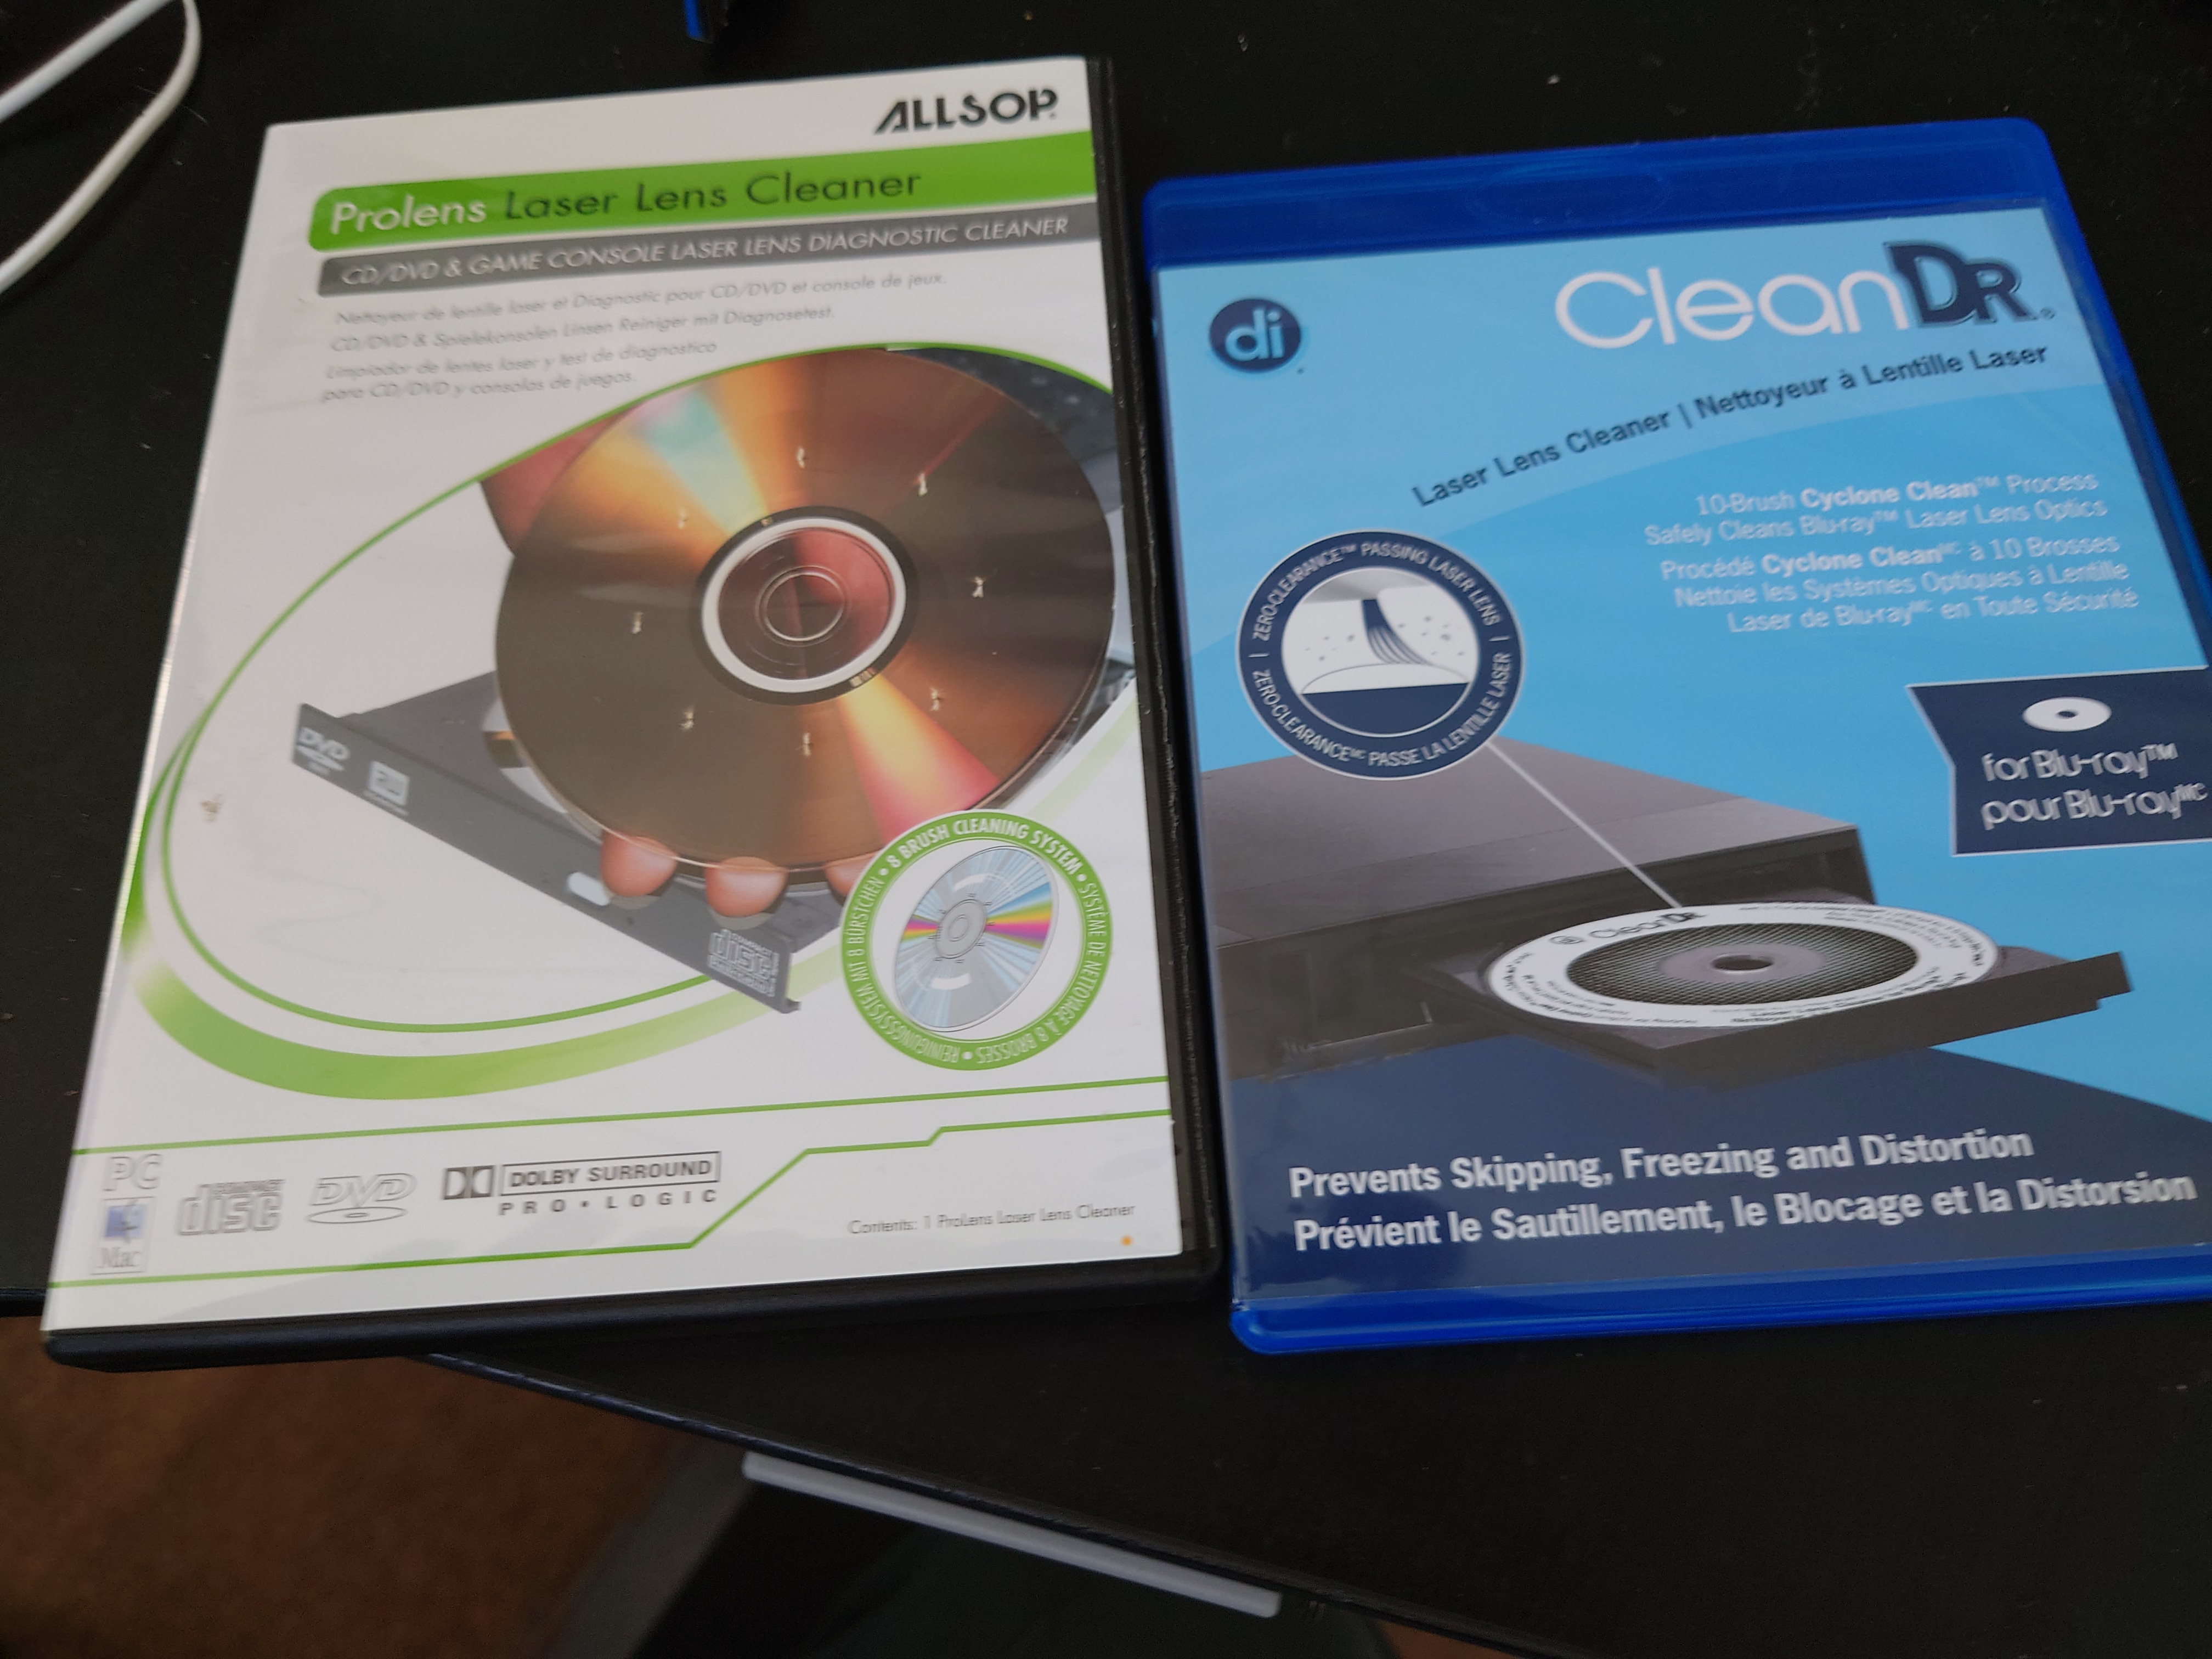
I use Allsop’s “Prolens Laser Lens Cleaner” for CD players, and DigitalInnovation’s “Clean DR Laser Lens Cleaner” for Blu-ray drives, DVD drives, and games consoles with those. They work great, and have already fixed an old CD player that wouldn’t work, and also fixed my second-hand PS4 which wouldn’t play Blu-ray games.

This is based off of the 2021 Reddit post here: https://www.reddit.com/r/PSP/comments/kcx4ei/tutorial_convert_most_video_formats_to/
I am using it with Handbrake 1.5.1. You can import it into your Handbrake via “Preset -> File Import”.
I had planned a different network toplogy for sure, but this is my current setup and it seems to work well:


I have nearly 20 years experience, so my skill-set is in high demand from all sorts of different organisations. If I were looking for a job, then these would be my priorities:

Now that I actually have the internet connectivity being installed to make use of it, I am getting my home network design a bit more finished.
Components:
Load-balancing internet connections:
ThinkStation Server:
Connection Speeds:
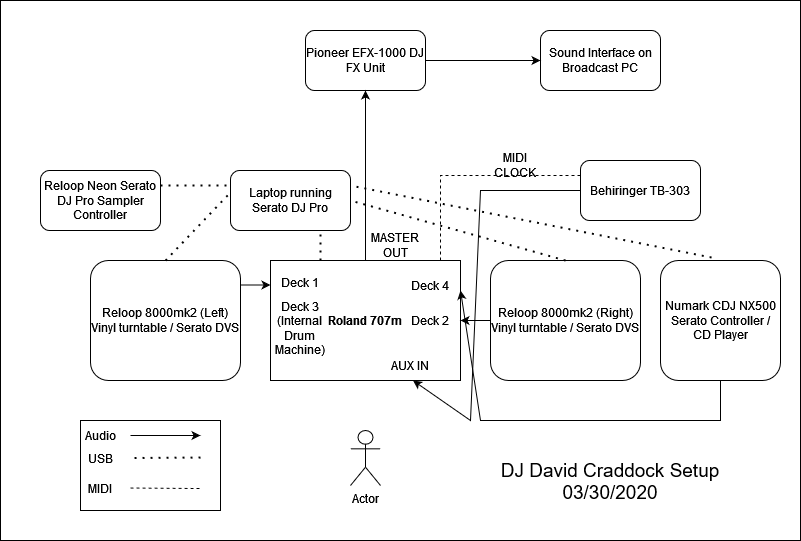
I have had this knowledge in my head for a long time now and thought it would be better to write a diagram to explain the current setup for my MIDI routing.
I use MIDI routing one way – MIDI OUT – from my UMC1820 sound interface.
I have two keyboard controllers, one next to my computer, and one next to my Eurorack, that are attached via USB to my computer which I route the notes via Ableton to the MIDI out of the UMC1820 interface.
I then selectively record the synths that I want to record. I don’t use MIDI channels, everything is making a sound at once when I press a key on the keyboard controller. I just record the hardware synths that I want to use in the track.
If I want to use multiple hardware synths in a track then I do multiple MIDI tracks and multiple records.

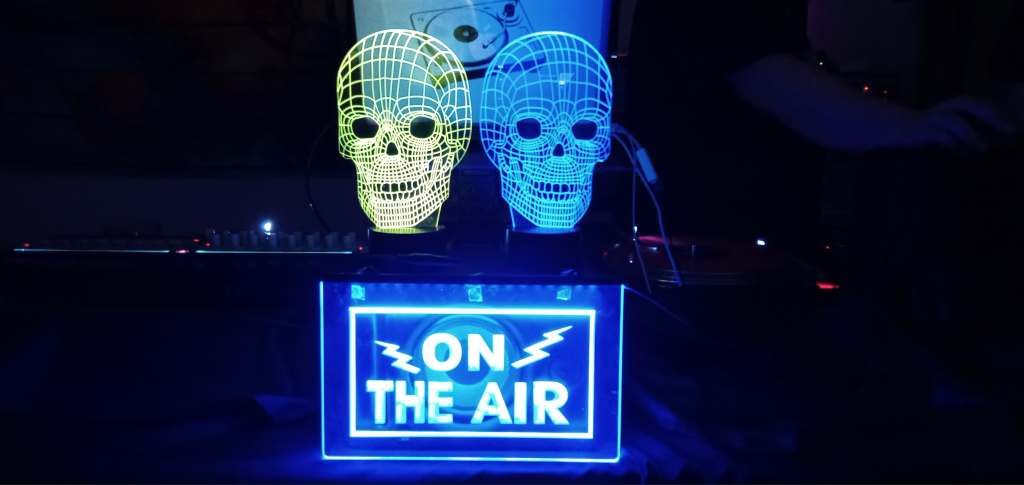
This is my current DJ setup that I use for Twitch streaming mainly.
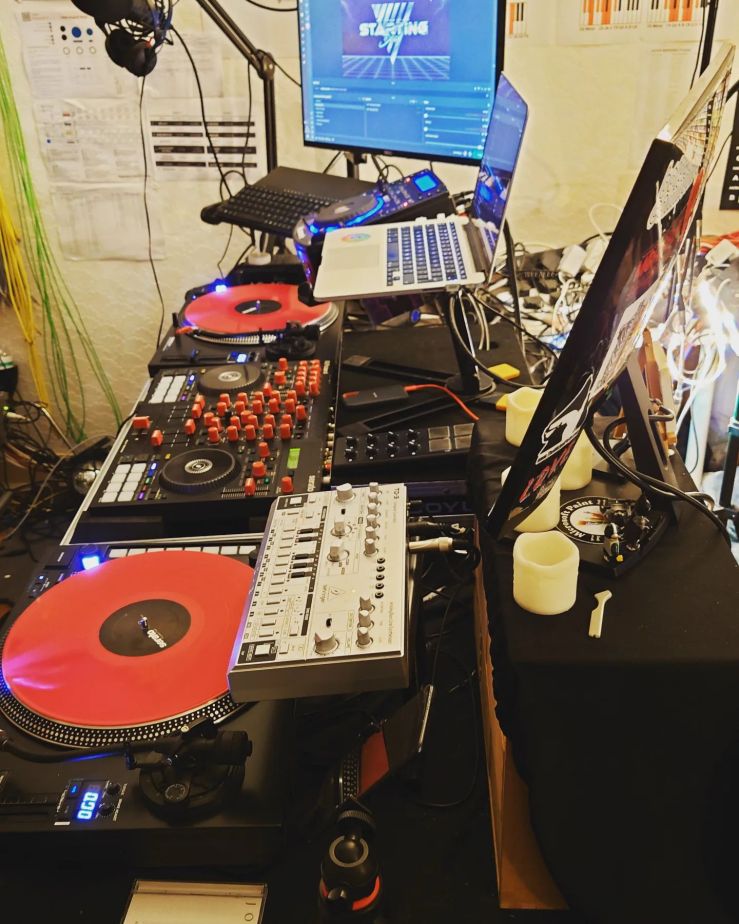
The audio signal flow is below:

On Serato I have 4 decks mode enabled:
Deck 1 – Left Reloop 8000mk2 running in CDJ DVS mode from the preamp to line input (PC mode)
Deck 2 – Right Reloop 8000mk2 running in CDJ DVS mode from the preamp to line input (PC mode)
Deck 3 – Inbuilt Roland TR drum machine used for redrumming tracks and also providing a drum loop for use with, and outputting MIDI, to the Behringer TD-3 (TR mode)
Deck 4 – Numark NDX500 CDJ used in Serato DJ Mode (PC mode)
I have a MIDI cable running from the Roland 707m to the Behringer TD-3 so that I can sync the acid patterns according to the beat of the inbuilt Roland drum machine on Deck 3.

This is my current DJ setup with the following components:
I have simplified things massively over the last year over my previous setups with the purchase of the Roland 707m. It it an amazingly clever piece of equipment and does so much. I think it is definitely one of the most advanced and most powerful controllers on the market today. This is what I can do with the new setup:
Ever since I worked at an internet marketing company on an advertising analytics platform, I have realised that I don’t want my personal internet browsing tracked, monetised, influenced, and sold to the highest bidder. These are the steps that I have taken to reduce (you can never totally eliminate) this process.
This is a DNS server installed on a Raspberry Pi on my local home network. I have all the internet traffic going through my Virgin Media router filtered through this DNS server. It has many privacy-boosting features, but its main claim to fame is that it blocks the vast majority of internet advertising and analytics traffic on the DNS level. It currently blocks 20% of the requests made, which results in approximately 20% faster internet for me, and a lot more privacy/less tracking/less adverts.
Using the Firefox Browser is kind of a no-brainer for internet privacy, because of out of all the main browsers available it is open-source and not controlled by a large commercial tech company. It has the best default privacy features out of all the browsers I’ve used. I use it on all my devices and the configuration is synced across all of them.
This is the best web page advert remover I have used. It is constantly updated with new ways of removing adverts as the main companies like Facebook find ways around it. It currently removes all the adverts on all the web pages I browse on, including Facebook, which is quite a feat.
This removes all tracking elements from URLs in web pages you load, automatically. Tracking elements are information passed through in parameters appended to the end of web page links which provide information on where the traffic has come from and the tracked behaviour of the web user on the previous site. This is particularly important in advertising analytics, and breaking this chain between websites does a lot to protect your privacy.
This plugin is not strictly related to privacy but does help an awful lot on online shopping. It analyses Amazon and eBay reviewers for patterns to help understand whether they are fabricated or not. Often online merchants will use fake reviews to boost an otherwise mediocre product. This helps me save money on those.
This is another level of general internet protection from the paid Kaspersky anti-virus product. Kaspersky costs me a small subscription every year but it is better than the free alternatives, and offers this browser plugin which has been helpful in sniffing out malware.
This is a simple description of how I work 99% of the time, as I am a simpleton. Origin/main is the new origin/master for future repositories, I just note both here for completeness because I use origin master for a lot of current repos.
git checkout origin mastergit pull origin mastergit stash pushgit checkout -b <branch name which will be made into a PR>git stash popgit commitgit push origin <branch name which will be made into a PR>git checkout <branch name which will be made into a PR>git pull origin master (or origin main)git mergetool which, for me, is vim’s three way diff tool.git add && git commit && git push origin <branch name which will be made into a PR>git commitgit push origin <branch name which will be made into a PR>After the last post I have added Ableton Live and my Eurorack modular to my DJ setup, with a master clock being sent via MIDI cables from my Roland TR8 drum machine that syncs with Ableton. The drum machine also can be used creatively for drum fills etc.
I hope these two diagrams explain my setup adequately – sometimes a picture is worth a thousand words! The ‘actor’ is me – I just couldn’t find a way to change that on http://draw.io 🙂


Yes! Some people actually write and read BOOKS on DJing. As if YouTube wasn’t enough. Well it can be enough.. but YouTube is also a cess pit of rubbish information, and at least a book has a better chance of being properly edited and reviewed. Also reading a book makes you more intellectual. Which is utterly true.
So. I have been reading through these DJing books to see if they could teach me something I didn’t know about DJing after over 10 years doing it. And there were quite a few interesting techniques and tricks that I learned from these.
How to DJ (Properly) – Frank Broughton, Bill Brewster (2003)
This is a great old book that I first bought when I was getting into DJing back around 2000. It covers so much technical and non-technical information that is still highly relevant today, but some parts are laughably out of date. I really wish they would update this book and put out a new version. A lot of the non-technical stuff you won’t find elsewhere and is really useful still. Definitely worth a read but don’t expect a modern take on things.
https://www.goodreads.com/book/show/1889346.How_To_DJ_Properly_
FutureDJs: How to DJ – Austen Smart, Scott Smart, Tom Dent (2019)
This is the book you want if you want a modern and uptodate introduction to DJing. It was designed as a textbook to help train high school music teachers so they could include DJing tuition in their classrooms. It’s amazing – really great – and contains lots of diagrams which help the explanation. If you want to get just one book on DJing buy this.
Rock The Dancefloor: The proven five-step formula for total DJing success – Phil Morse (2016)
I have to say straight away that I am quite biased as I don’t actually like Phil Morse of DigitalDJTips.com fame. I don’t find his reviews to be that accurate and often seem a bit like advertisements of products. I have learned some things from his website but not a huge amount. However this book has got lots of great reviews so I thought I’d mention it. I do have a copy but I found it a bit difficult to get through as it is all written in Phil’s quite conversational prose, with no diagrams or pictures or anything really to break it up. It may well be worth checking out to see if you can get anything from it though. I will probably try and get through it myself and give it a proper review, but just so you know it’s out there.
https://www.goodreads.com/book/show/31545542-rock-the-dancefloor
Beyond Beatmatching: Take Your DJ Career to the Next Level – Yakov Vorobyev, Eric Coomes, Bill Murphy (2012)
This is quite an interesting and quite advanced book by the developers of Mixed in Key. In it, they talk about using MIK’s features to detect musical key and energy level, and how you can use those features to plan your set around harmonic mixes and energy level arcs. It is quite advanced and very interesting. MIK is a pretty good piece of software, I have had it crash a few times when analysing very big libraries but generally it is pretty solid. I recommend checking this out, because although the basics of harmonic mixing are probably talked about in any recent DJing book, this goes into greater depth.
https://www.goodreads.com/en/book/show/19218202-beyond-beatmatching

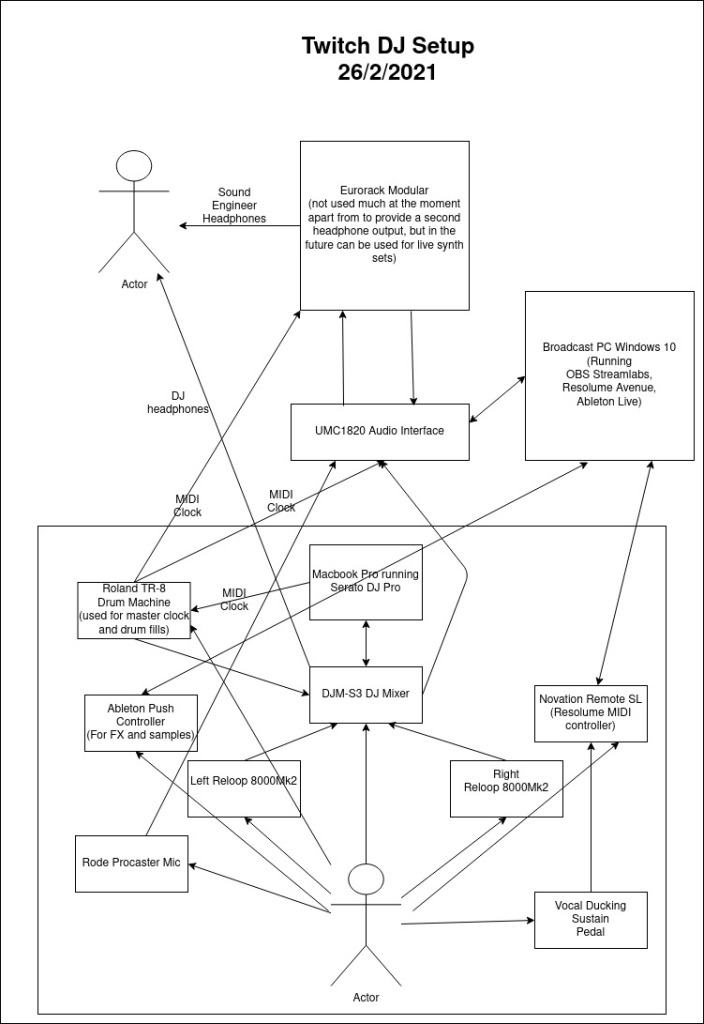
I thought I’d write a bit here about my Twitch DJing setup and some of the hardware and software I’m using. Twitch streaming has become very popular over the lockdown period, and I think people might be interested in how I have configured my stream. Something that seperates my stream from anyone else I’ve seen on Twitch is that is that I do live vinyl DJing AND live VJing at the same time on my stream. This is how I achieve it.
Broadcast PC
This is my main desktop PC that I use for personal use as well as streaming. It has a Nvidia 1080 graphics card which is very useful with Resolume Avenue, the VJing software I use. I have one main big monitor and one smaller second monitor which I have attached to a long HDMI cable and placed next to my DJing desk along with a second mouse and keyboard which goes into a USB 3.0 hub and a long USB 3.0 extension cable. When I go to DJ I set the Windows graphical settings to duplicate my screen on both screens, so I can control the broadcast computer from where I am standing next to my DJ equipment. I have a Behringer UMC1820 sound interface which has 8 balanced phono inputs. Inputs 5&6 are permanently connected to my DJ mixer, and I use Input 1 for my microphone.
Broadcasting Software
I use Streamlabs OBS on my broadcast PC. I did initially subscribe so they let me download one of their custom themes, which I have heavily edited but still remains integral to my setup. For some reason even though my subscription has lapsed that has not made any difference to whether I can continue using this theme and the app, although it has turned my follow/subscription/bit notifications back to the plain old free ones. I prefer it over free OBS for three features at least.
Firstly, the studio mode – I am not sure if OBS free has this (maybe it does?) but it is useful when fixing things live to have two scenes active, one which is being broadcast and one which is only visible to me. Secondly, the way you can order the layers on the scene, this is very intuitive to me and was more intuitive than the layering (front to back) on OBS free. Thirdly, the remote control element.. I have a remote control app for my Android tablet and phone which allows me to quickly cycle through scenes – no need to shell out for fancy scene controllers.
I use the free NDI tools for NDI streams to Streamlabs OBS for the external video elements on my screen – one from Resolume Avenue on my broadcast PC and the second from my Macbook Pro which is running Serato Video. I also use streamelements and Moobot to enable kappagen effects, and to moderate the chat and provide information to chatters.
Cameras
2x Logitech C920 web cams on tripods. I bought them because I saw them used at the BBC where I used to work. I think if I had more USB3 ports on my computer the bandwidth for these cameras would be increased and the resolution would be wider, but as they are, they are really solid. I’ve only had occasional problems with the auto-focus when there is a lot of lighting strobing going on.
DJing Equipment
I have a pair of Reloop 8000mk2 turntables with a Pioneer DJM-S3 Serato mixer. Both integrate really well with Serato and offer additional performance features. I use Serato on my aging Macbook Pro 2015 and have actually got it to reliably output Serato Video using NDI capture tool and send it over the network to my broadcasting computer without the fan having to spin up. I only use Serato on my Macbook because I don’t want to burden it – it is doing enough as it is! I have a 2TB external HD where I put all my digital music files and have it mounted as a network share so I can transfer files over the network from my main PC. I use Mixed in Key to add Serato cue points to music I use, and the free MusicBrainz Picard to correctly tag files and organise my music collection.
Lighting
I use Phillips Hue lightsources and the hyeDynamic Windows 10 app. It connects to the Hue hub strobes the lights in time with an audio input. I have a Hue Lightstrip and 4x Hue Colour bulbs and they all sync together. I also have a small laser unit that syncs in time with the beat and is useful as added background lighting.
VJing
I use Resolume Avenue with a number of clips I have commercially bought. I have it running mostly in autopilot mode with all the clips synced to the beat. The beat is provided by a free app called ‘AudioBoxBaby’ which I am really looking to replace, but there is simply nothing else out there on the market. It detects the approximate BPM of any audio coming in on my sound interface from my DJ mixer, and translates it into a single repeating midi note. This midi note I have mapped to the tap tempo button in Resolume so it is like a human tapping the tempo along with the music in theory. Serato DJ Pro supports Ableton Link, and so does Resolume Avenue, but I have found that syncing via Ableton Link to be very problematic when using Serato, and of course it doesn’t work when not using Serato, for example with all vinyl sets.
I also have a Novation Zero SL controller which I have had for over 10 years and still works perfectly, so I really recommend it! It is attached via a USB extension cable to my broadcasting PC and I use it to control some basic VJing effects that I put over the audiopilot clips to create buildups and visual changes in time with the music. It has 8 sliders and I move them in time with the beat or to create buildups/variations etc.
Microphone/Voice
I have a Rode Procaster mic with a Rode microphone boom, shock cage and pop shield, which is attached to my audio interface for my broadcasting PC with a long cable. I have it wired so that when I press a piano sustain pedal on the floor under my microphone, vocal ducking happens – e.g. the music fades down slightly and the microphone volume fades up so you can hear me talking over the music. In order to accomplish that I use two commercial apps, the first called ‘Auto-Duck in Real Time’ which allows me to configure the vocal ducking linked to a keyboard keypress, and ‘Bome’s MIDI Translator Classic’ which when the MIDI signal that is generated when I press the sustain pedal connected to my Novation Zero SL controller, the MIDI translator converts it into a keypress that is picked up by the ‘Auto-Duck in Real Time’ app to trigger vocal ducking. I have it configured so while I am holding down the sustain pedal, it ducks the music playing and when I release it, the music goes back to normal.
Internet Connection
I have a fast Virgin Media internet connection with 30mbits/second upload. I think my Twitch stream and everything else in my home requires about 5mbits/sec upload! I also have a backup internet fibre DSL connection that thankfully I have never had to use when I’m streaming, but it also has around 15mbits/second upload and I should be able to switch between both relatively quickly if I needed to.
Phew! That’s all! 🙂 I realise it is technically involved compared to a lot of peoples setups, but I have always been really interested in the technical side and have been lucky enough to be able to create exactly the setup that I really wanted for my stream. If you’re interested in checking it out, my regular stream is from 4PM UK time/UTC every Sunday and I play for at least 4 hours. Follow me on Twitch at: http://twitch.tv/djdavidcraddock
Struggling with the technical side? If you are interested in hiring me to help develop your own streaming setup, I have worked before in this capacity and can supply excellent references. The work can be done online, as with your permission I can remote control your computer and configure things. Please send me a message if you are interested via the contact form on this website.
Journalism has deteriorated to a huge degree in the online age. A lot of articles and video content are one-sided short ‘clickbait’ – short messages designed to trigger an extreme emotional reaction. ALMOST ALL journalism is like this these days, it doesn’t matter if you have a highly established news network you have been trusting for decades, they have all had to adopt this low-quality strategy due to the ultra-competitive and dire financial situation that all news reporting finds itself in. However a lot of people still take news content at complete face value, and this leads to a huge number of people being misled about the real facts.
So, whenever you are reading, listening to, or watching a piece of news content, here are some questions you can ask yourself to really get the full picture of what you are consuming.
1) How long is this news article/segment? What depth does it go into? Broadsheets like the New York Times go into much more depth than a 10 second ‘news highlights’ clip, and will usually present a much more detailed and extensive argument. If you really want to understand something, as the saying goes, read a book – or better yet, several books from several different perspectives. Do not expect to understand the full issue from TV news segments.
2) What emotional reaction is the journalist trying to get me to feel? What language does the piece use, what quotes are they using, what video are they using, what music do they use to set the scene, is the news anchor looking like they are being particularly dramatic? What is the emotional message?
3) What is the editorial slant of the news source? EVERY news source has an editorial voice – or bias – and you need to take that into account when getting your news from that source. It doesn’t matter if you generally agree with the editorial voice, you have to understand that everything is biased. News isn’t free and a lot of news sources get their funding from various ‘benefactors’ who often have a very real say on their editorial bias. Knowing how the news organisation is funded is very important in knowing what slant they will take, especially when it relates to political news.
4) Does the news piece provide a fair and plausible representation of both sides? There are ALWAYS two sides to the story, this is something that has been all but extinguished in modern news reporting. A few news sources will set up often comic ‘straw men’ opposition points, like the BBC interviewing odd people who drink their own urine for a news piece on how health information is understood by the public. While this may be amusing, it is not meant to present a fair and accurate argument from both sides, it is designed to ridicule one side. There are usually some genuine points from each side that are worth everyone considering, no matter what story it is.
5) Seek out contrary points and opposition points of view. If you want to understand a news event further, seek out a number of different articles from respectable sources with very different editorial voices/biases. Even when you take into account their individual biases, there are usually some valid points underneath it all.
I hope that everyone will consider thinking more criticially about the news they consume.


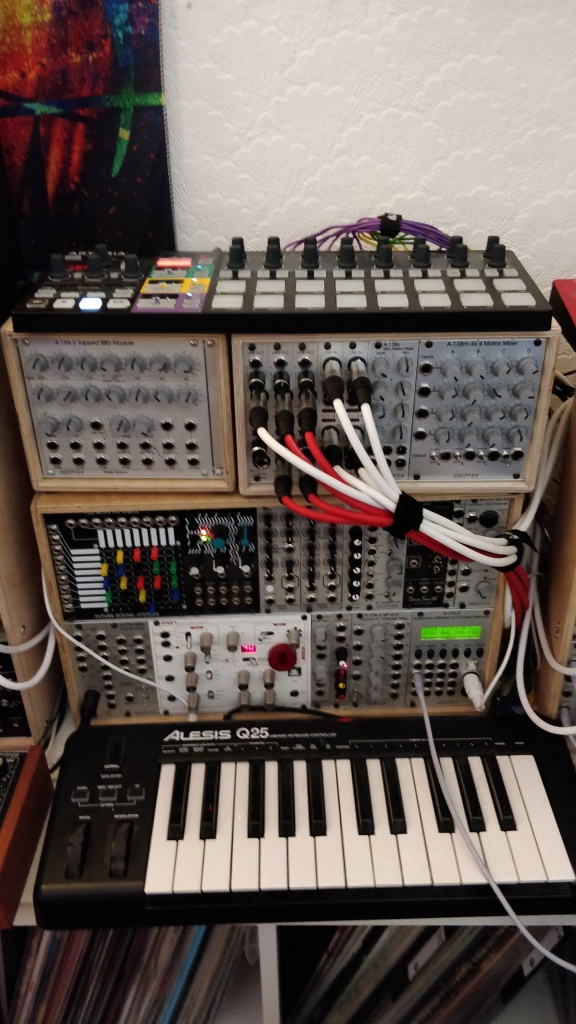
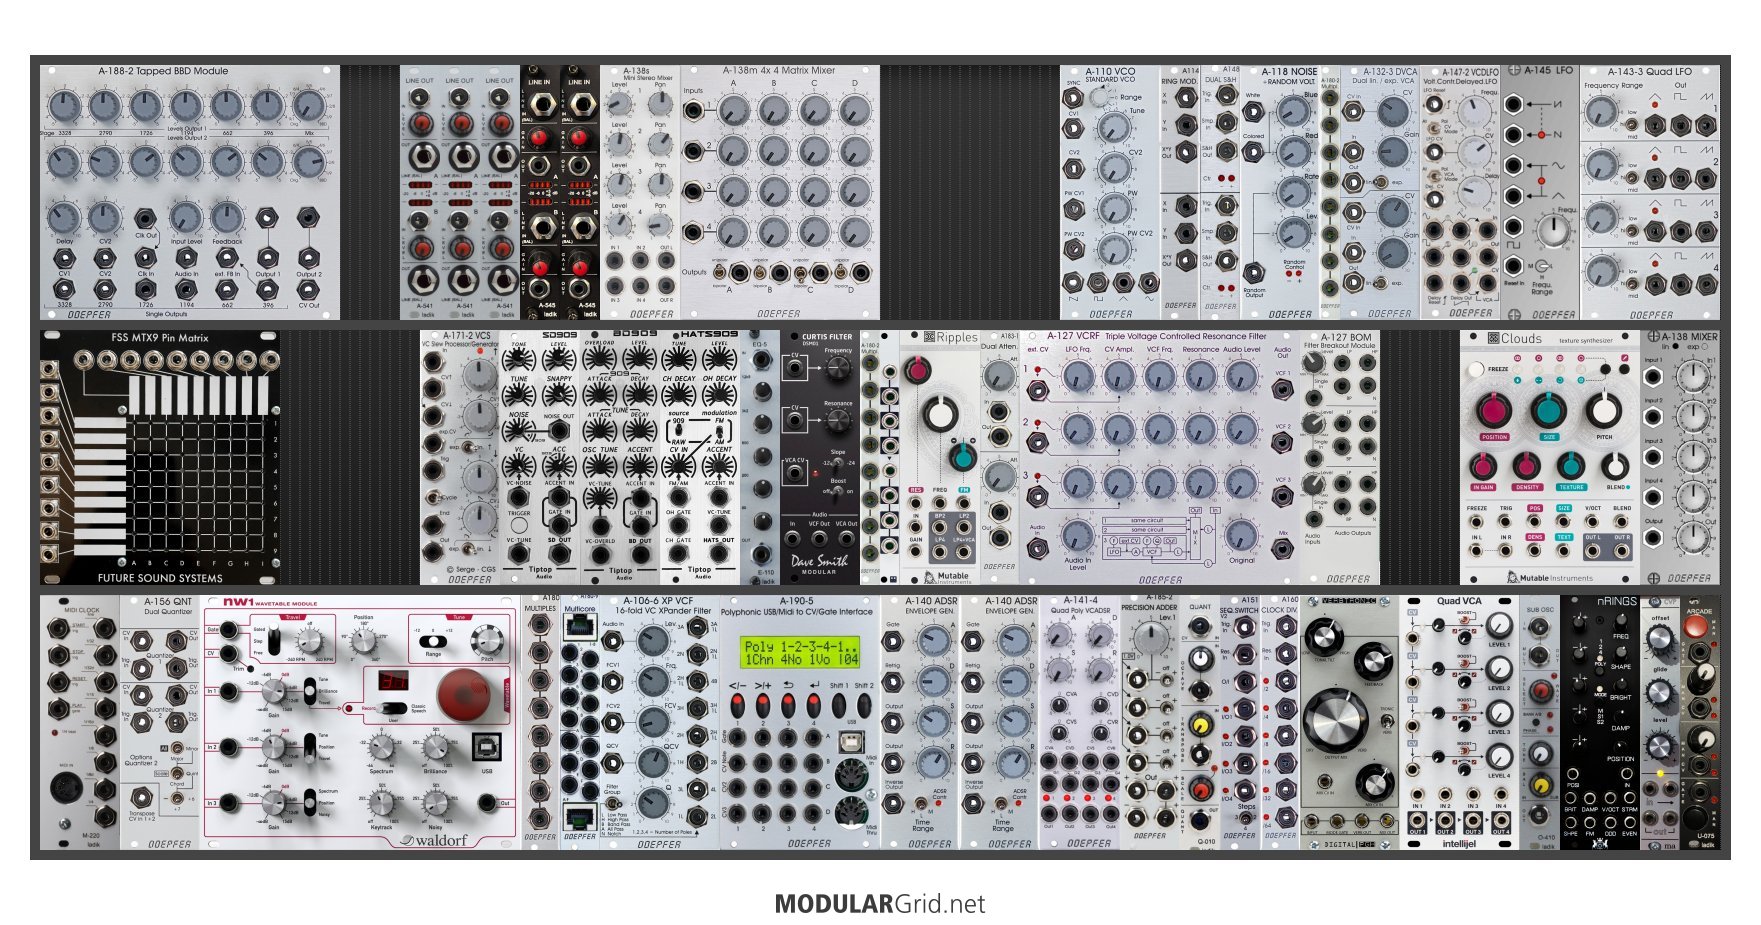
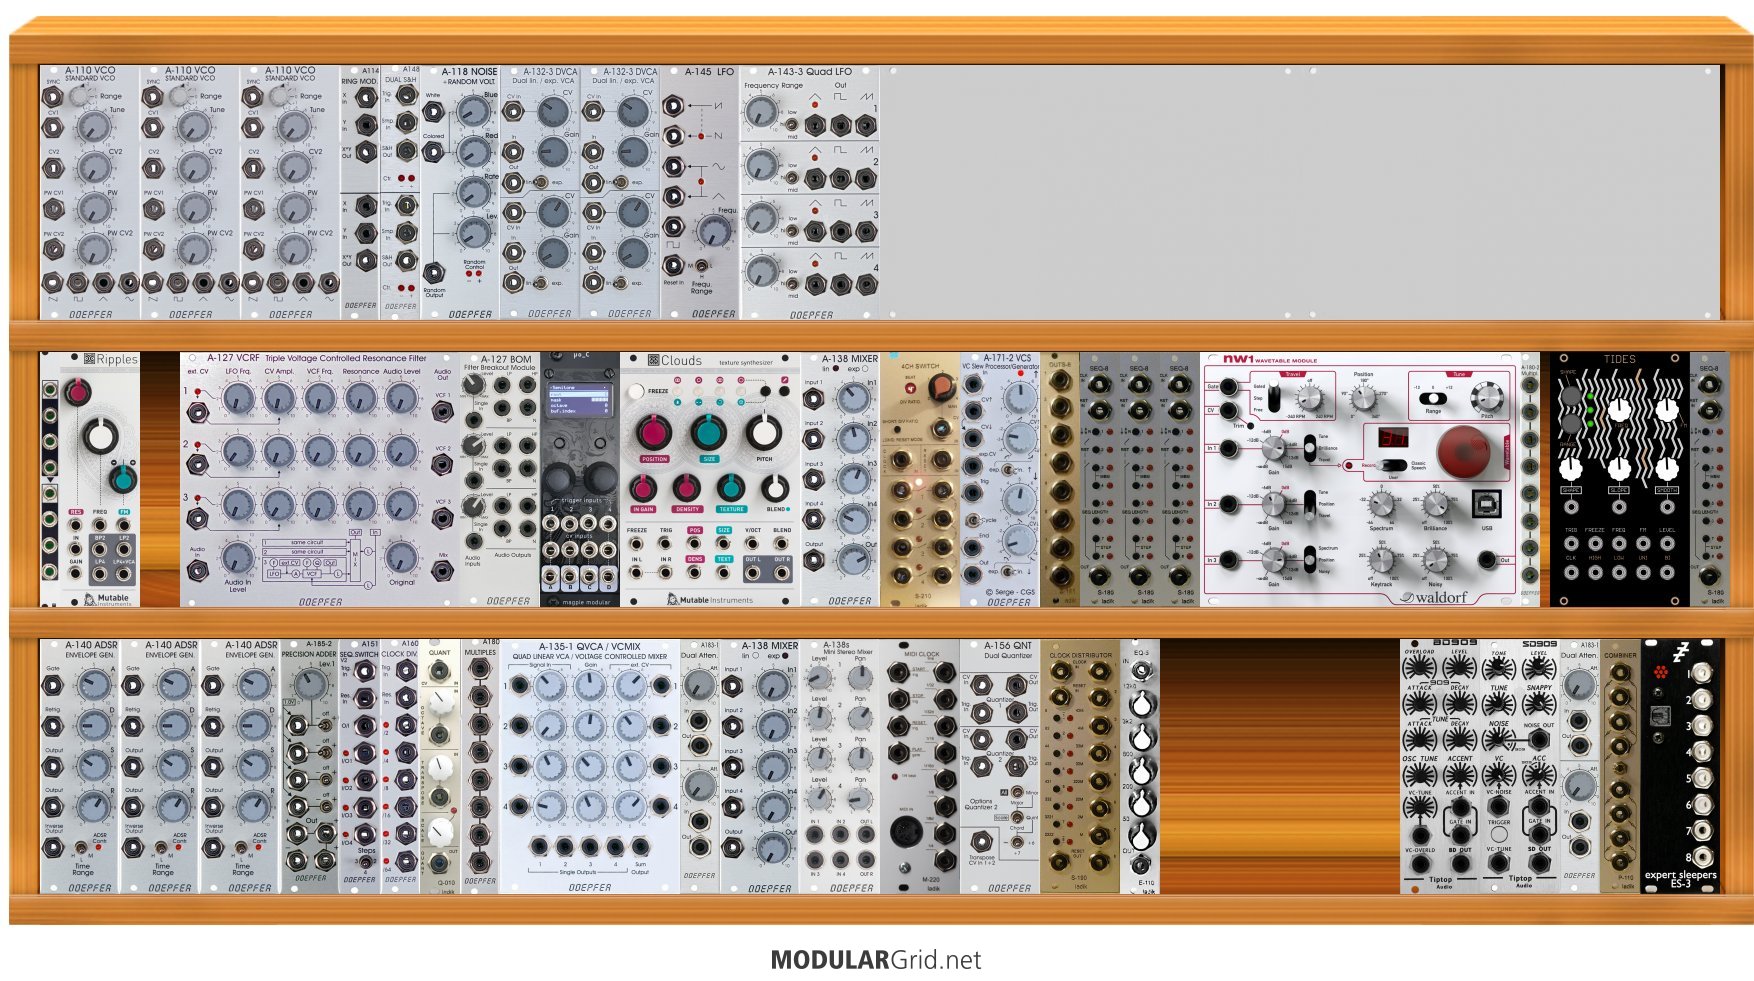
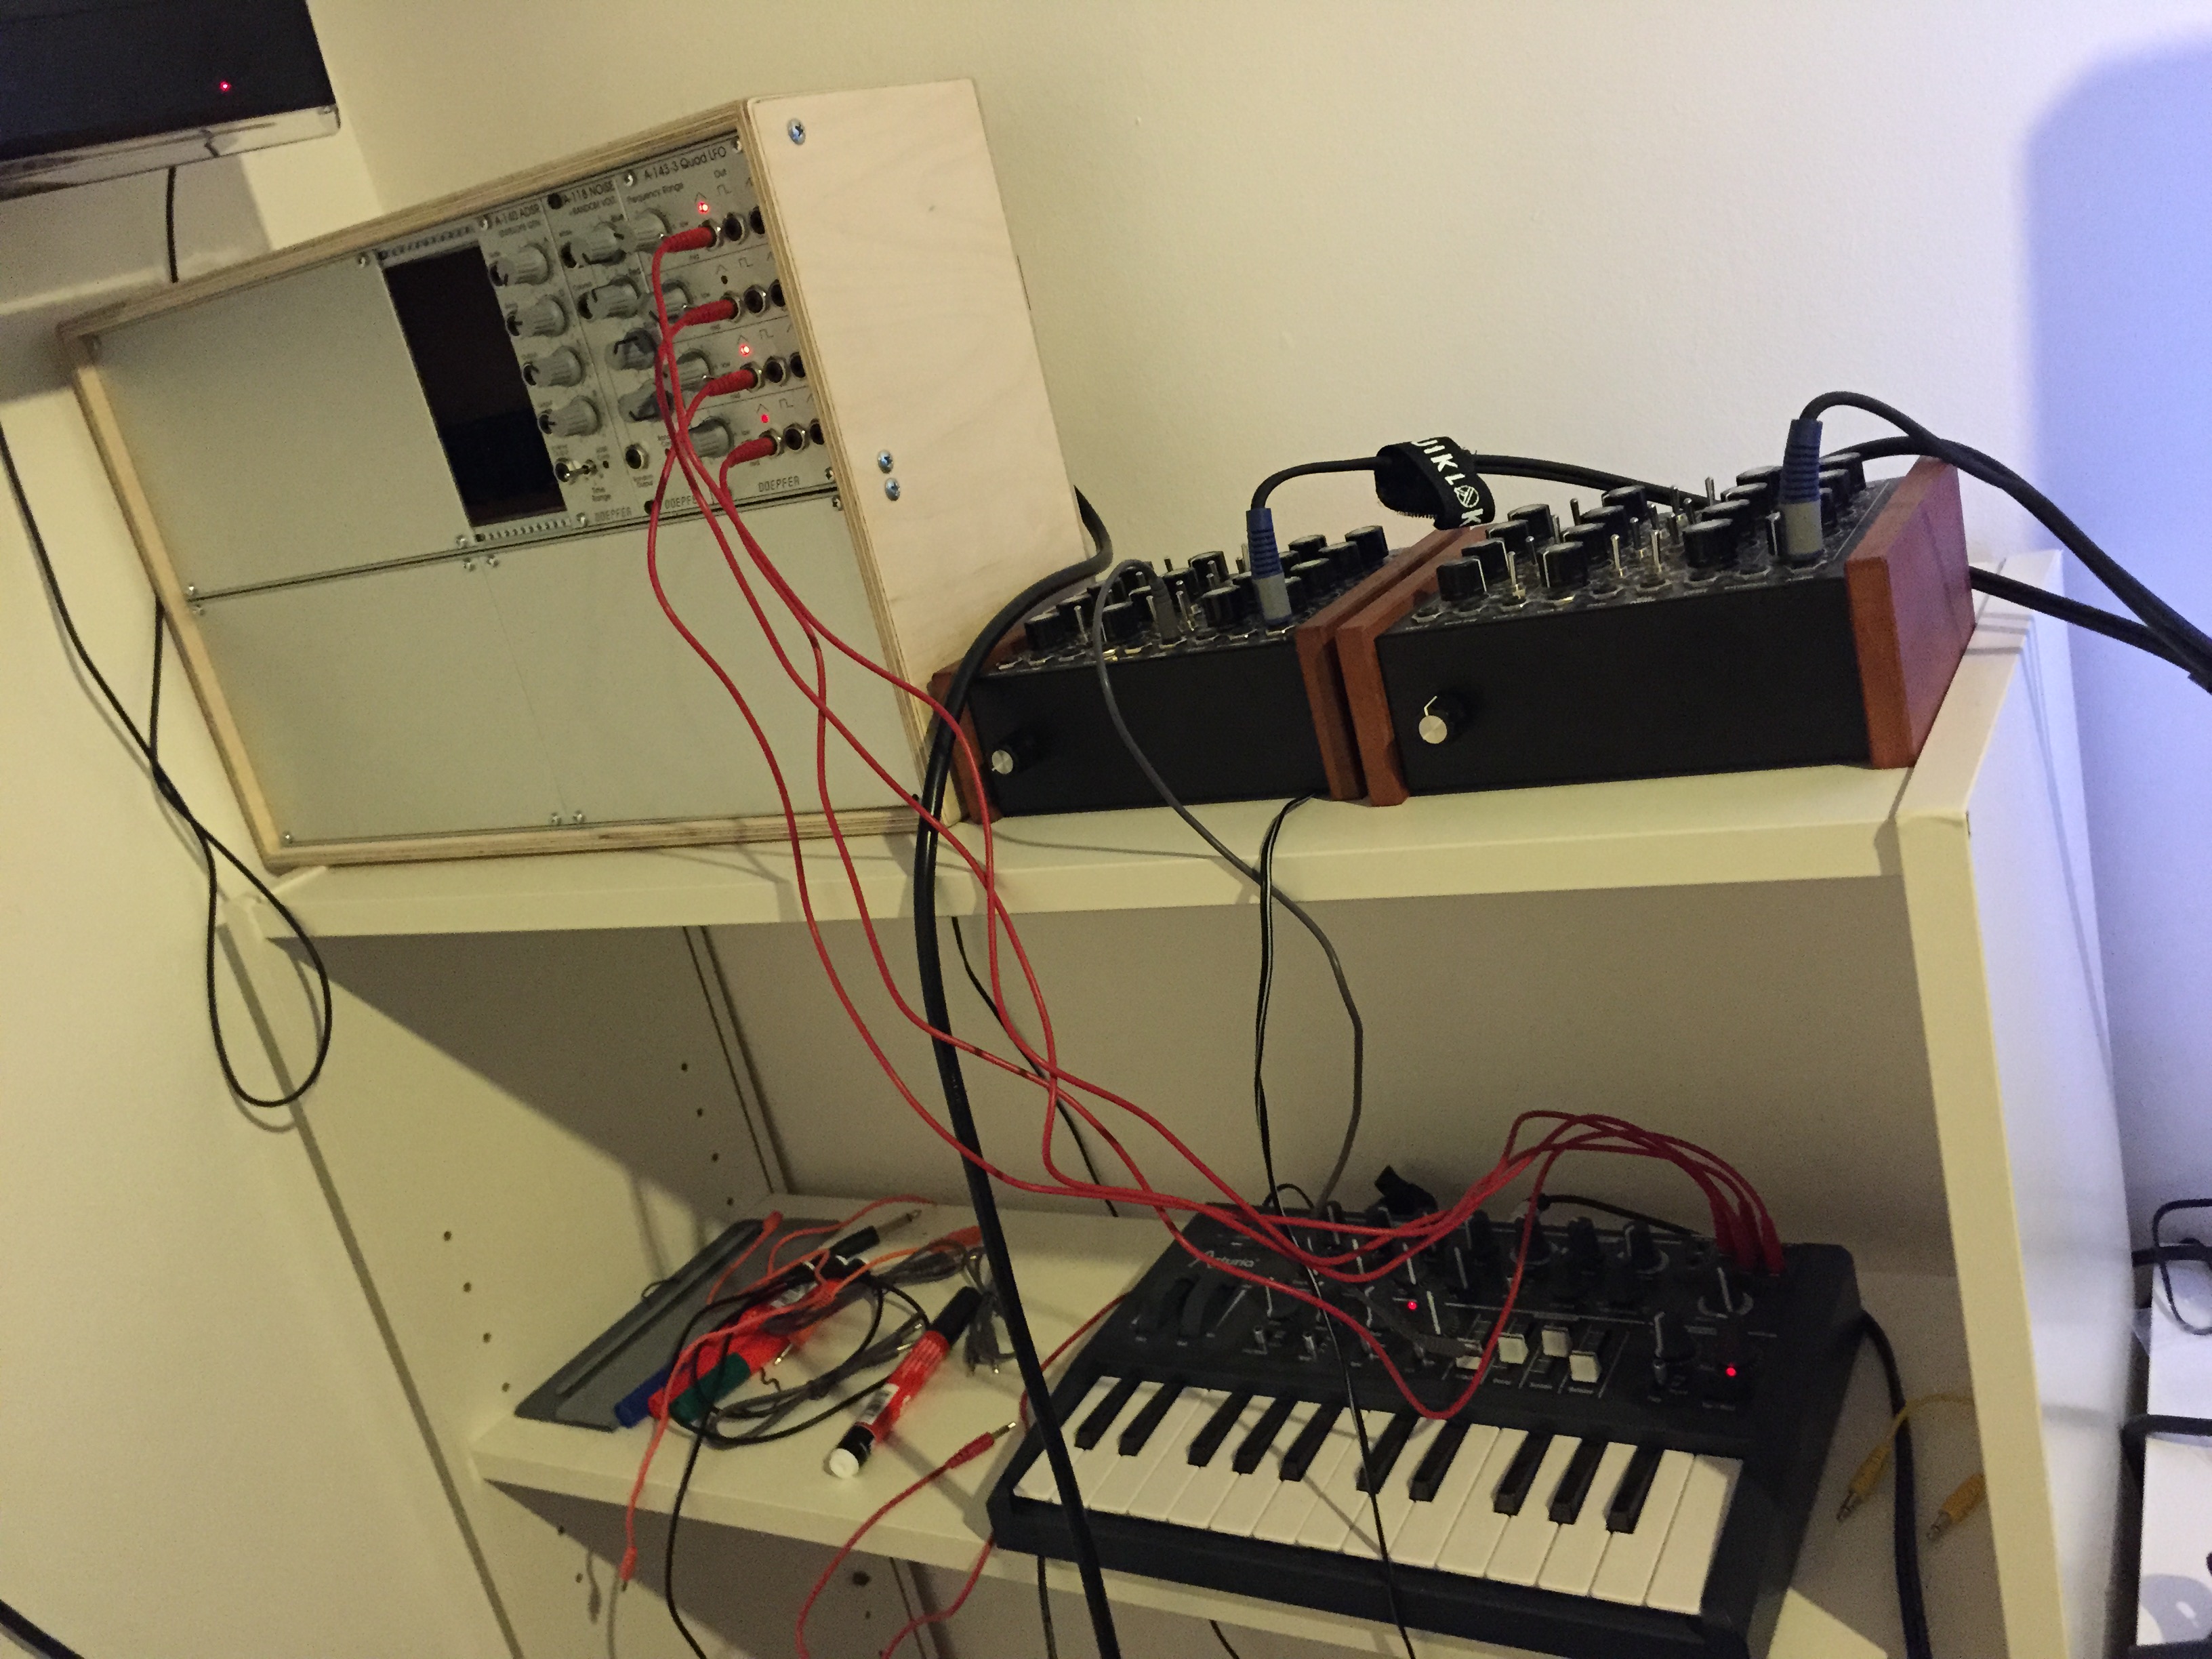
So.. finally my 27U Eurorack modular synthesiser is complete. I have filled up the third – and surely last, as there is no more room in the studio! – case. I started this Eurorack modular in 2015.. so I am glad it is all complete now. I put in a small amount nearly every month for new modules. I am not some ‘rich kid’ who could afford to buy everything at once – and indeed I think my gradual approach has benefitted the overall modular because it’s made me think about what I actually need, and given me time to learn as I go along.
These are the details for the (newest) left section case:
https://www.modulargrid.net/e/racks/view/1225766
These are the details for the middle and right sections:
https://www.modulargrid.net/e/racks/view/744839
Very happy!
In our house, seperate to my main PC (see the tab above) we still have two Ivy Bridge-based PCs:
Conny’s PC
My wife uses this as her main PC, and plays quite a few games with it. For a CPU and motherboard that I put together in 2011 or so, I am quite amazed it still runs adequetely! It runs the games she wants to play, the most graphically intensive being Deadpool, but it will also cope with Borderlands 2, Skyrim Special Edition, Shadow Warrior 2, and others. She is not interested in the top graphics games, but it runs just fine.
My Second PC
I have a computer that I use for my own programming and tech hobby projects. It used to be a top of the range workstation 2011 and I got it in a hardware disposal sale at Arm Ltd for only £400 in 2019. This is quite the deal, as it included a lisence for Windows 10 (normally costs £100 on its own).
I don’t need a powerful graphics card as I don’t game on it, and the Radeon R9 3200 supports my 2560x1440px monitor so it is more than adequete. I have installed VMWare on it and am looking to spin up some virtual machines as servers, and have them running in the background while I am browsing. I could assign several cores and quite a lot of the RAM and not really notice a difference with the light work I do when using the computer.
I am just amazed at how much you can do with these old high-end CPUS. The performance delta between these Ivy Bridge 2011 CPUs today’s processors really isn’t that large, and they are so cheap these days. This following video shows just how cheap you can build one of these setups, and how powerful they are even today:
The only situation where these processors don’t really work hugely well is in applications which emphasise single-core performance – I tried to use my second PC as an Ableton Live machine, and a lot of audio plugins I wanted to use were not optimised for multi-core processors, just single-core, so that didn’t work well.

I have made some considerable modifications to my modular since my last post. I have a 4-voice polyphony setup now with multiple voice Osc, VCA, Envelope and MIDI-CV modules, allowing me to experiment with polyphony voicing.
Elsewhere, I have added an Access Virus C synthesizer to my studio, and now have rack-mounted Behringer Model D and Emu Orbit 9090 synthesizers. I have also upgraded to Ableton 10 and use NI’s Komplete suite including Massive X, plus TAL-NO-UX Juno 106 softsynth, Sylenth1 and others.
Finally I have finished my Eurorack synthesiser! And I know many people say that ‘Euroracks are never finished’ but this one absolutely has to be, for financial reasons. I think that I have got to a place where I have every major feature common in most synthesisers, but in a modular instrument format. It is a great place to learn about different synthesis techniques.

This is the layout on Modulargrid.net where you can examine each module.
In January 2015 I put in an order for my first Eurorack case. Little did I know that I would end up filling that case and buying a larger one. Finally, 2 years and 3 months later, I have nearly finished assembling what will be the complete Eurorack. I have been buying a module or two per month, researching what I need and playing a lot with what I have got already to find out its limitations and areas for possible expansion. It’s much like incrementally building and upgrading a gaming PC really, although with very different results.
Today I have come up with a final plan for what the cases will contain. The picture below is slightly misleading, I have two cases, so the case below is actually split down the middle into two enclosures. The left-side case is 2/3rds the size of the right hand case, that is why there is a grey unusable area at the top left.
With the purchase of 4 modules this month, I’m nearly at the end. The remaining 3 modules will be bought and installed over the next month or two, depending on budget.

In addition to the Eurorack modular, I also have a polyphonic MIDI->CV converter called the CV.OCD which plugs into the modular, a Nord Drum semi-modular analogue drum synthesizer, which also plugs in and allows me to make and play drum sounds, a Korg SQ1 sequencer which allows me to add 2×8 step sequencers to the mix, a MS20 Mini semi-modular synthesizer and a keyboard controller which allows me to play notes and chords on the whole damn thing.
Design
I have built a synth roughly around three goals. The first is keeping a traditional ‘East Coast’ 3 voice subtractive synthesiser format, e.g. 3 oscillators, 3 filters, 3 envelopes, lots of LFOs and modulation, 3 VCAs, mixers, an FX unit including delay, reverb and others, 4×8 step sequencers which can be chained together (plus the 2×8 step in the SQ1). The second is that I wanted 3 voice polyphony – not ‘true’ analogue polyphony because that is difficult to achieve – but 3 of everything, wired together with a polyphonic MIDI -> CV controller, allowing me to play chords and experiment with traditional musical structures. The third goal was to keep the cost down! I am really not one of these modular synth heads with a huge studio and a near infinite budget, I have a lot of financial outgoings which I have met while building this. Building a modular synthesizer is never really ‘cheap’ in any sense of the word I would use, but this is definitely a lot cheaper than many other modulars I’ve seen, without compromising on quality.
What I have Learnt
Looking at my past posts, you may notice that I didn’t set myself any goals for 2016. Looking back, this was a mistake, so I’m going to remedy this by setting some for 2017.
Goals:
Not too many goals this time, but some important ones, and I think I’m in a good position to commit to these thanks to the support of my partner, and therefore I am in a position to improve my life.
Will post updates at some point during the year to chart this progress.

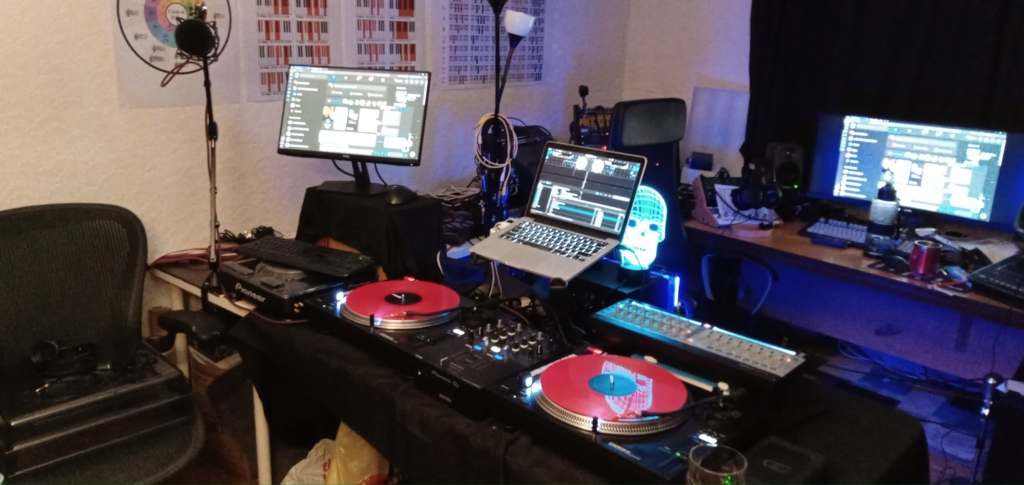
This is my current studio setup.
I have the following gear:
Eurorack 9U case
Eurorack 6U case
KORG MS20 Mini Synth
Roland TB3 Synth
AY3 Chiptune Synth
Roland A500-PRO Keyboard Controller
Nord Drum Synth
Macbook Pro with Ableton Live 9 Suite
MIDI.OCD Polyphonic MIDI->CV Converter
Samson Patchbay
I am looking to sell my Acces Virus A and concentrate on filling up the remaining Eurorack case holes.
I am currently moving the blog, which was formerly hosted on Dreamhost, to WordPress.com hosting. Most of the content is moved over already, I have to go through all the posts and tidy up the references, relink the images etc. Hopefully I will get around to this shortly.
In 2017 I want to build a relatively static hardware-based workflow. This is what I’ve chosen:
The components are:
With my current setup, I’m trying to make as much music ‘out of the box’ as possible, away from the computer as I find it more fun.
Synths:
KORG Minilogue: I use this for a keyboard controller, and I use the 16 step sequencer to run simple sequences. It connects to the PC via USB and has MIDI output. I can also use this as a synthesizer its own right, it’s good for backing chords and pads.
KORG MS20 Mini: I’m borrowing this from a friend. I will use it as a bass synth mostly. I’ve got a Harvestman English Tear module which connects it to my Eurorack.
Effects:
Electro Harmonix Stereo Memory Man with Hazarai: This is an effects pedal with reverb and delay, which I use to add a bit of effects to modular synthesizer before I record. I will also use effects within Ableton, but I like the sound of this pedal in general.
Drum Machine:
Nord Drum Mk1: This accepts triggers from the Eurorack I’ve recently discovered, so I have a drum machine that I can connect up to the Eurorack with 4 different drum voices.
Modular:
This is equivalent to a fairly standard three oscilator synth, with ring-mod, S&H and noise out. I have a few different filters, an XPander style filter, an ‘extreme’ filter which is loosely modelled on the MS20 filter, and a triple resonance filter which I use for noise soundscapes. It has two envelopes, and a Make Noise Maths and a Serge VCS equivalent for some modulation madness. It also has a 16 step sequencer.
Workflow:
I still use Ableton Live as a midi sequencer, creating midi clips for drums and the hardware synths. I will build up a patch on the synth, tweaking until it sounds servicable, then make a midi clip, record some loops from the synths, and cut up and move the audio around to compose a track. I might add some soft-synths and effects such as reverb and delay on the PC and mix the track. Then I will upload it to soundcloud and show it to musically minded friends. Depending on what they say, I may tweak the track and upload it again. This whole process usually is done within the space of a day or two, I sometimes spend longer for tracks that I want to be more finished and professional, but I am not really usually making music for more than a few people at the moment, so I don’t spend ages finetuning each track.

When I first started getting into computer roleplaying games in the 90s/00s I remember playing the Infinity Engine games by Bioware and Black Isle, such as Baldur’s Gate 2, the original Fallout games, and of course Planescape: Torment. It was the quality of writing that drew me in and took me to another world, the graphics were just a background setting to that writing.
Somewhere in the 2000s RPGs became more action orientated and prioritised mechanics and visual appeal and combat over branching stories. Nowadays a lot of popular RPGs are those such as Dark Souls, which seem more about combat and atmosphere than anything else. Blockbuster games such as Dragon Age: Inquisition and The Witcher 3 still show that great writing, characterisation and real player choices can still be popular.
I still prefer the classic RPGs of yesteryear, those with mountains of dialogue and that take direct influence from fantasy novels and pen and paper, Dungeons and Dragons type games, which I grew up with. Here are some games which capture some of that great writing for me, although some are more interactive fiction than technically RPGs:
80 Days
You are the butler of Philleas Fogg, the man Jules Verne writes about in ‘Around the World in 80 Days’. Your task is to choose how to get around the world not more than 80 days, as you plan routes between cities, buy and sell items and manage the finances of the trip. It really captures a sense of adventure in the world, and builds on Jules Verne’s steampunk theme as you encounter fantastical means of transport such as mechanical ostriches, airships and others. Every route is different and you can choose how the story unfolds by selecting different actions your character will take. The writing is the best I’ve ever seen in a mainstream game.
http://store.steampowered.com/app/381780/
Sunless Sea
In this game which also takes influence from Jules Verne, the city of London has fallen through the crust of the earth into hell, where there is a giant underwater cavern called the Underzee. You sail across this underground sea, exploring islands and immersing yourself in this Vernesque/Victorian/Lovecraftian setting. The writing again is amazing; it reads like poetry.
http://store.steampowered.com/app/304650
Torment: Tides of Numenera
Another outlandish game, this time set in the world of Monte Cook’s Numenera, the writer behind the Planescape world which Planescape: Torment was set in. It hasn’t fully been realised yet but this game in early access form is already weird and wonderful, and much more interesting to me than yet another copy of on the elves and dwarves Tolkien formulaic settings.

So.. the problem, as so many people have said, with getting into building a Eurorack modular synthesizer is that it becomes addictive, and you inevitably spend more than you can really afford. That said.. I now have a great fully customised synthesiser for what I want to do 🙂 The layout is:
3 oscilators and noise generator in the top left, 4 VCAs and S&H and Ring Mod sections in the mid center, LFOs in the top right.
Filters! I love filters. 3 large format filter modules, and a Triple Resonance Filter which consists of an additional 3 filters packed into one unit. A quantizer is also there which I currently don’t use much.
Envelopes in the bottom left, Voltage Controlled Slew Generator and Make Noise’s Maths in the center left, center right is my trigger sequencer setup from LADIK, bottom right is attenuators and linear and exponential mixers.
I use a heavily customised setup for vIM, the text editor that annoys me the least in ~30 years of using a computer. You can see my exact setup in my dotfiles repo on github, https://github.com/wordswords/-.
Here are the plugins I use:

At the start of 2015, I wrote down some goals for 2015. Around half-way through the year, I revisited these goals with some thoughts on how well I’d done. Now 2015 is over, I want to reflect on what has been achieved and what hasn’t.
I also want to comment on the fact that I am discussing personal things here. A few years ago I was decided that I was going to keep this blog professional and pretty much dry of any thoughts or feelings on my personal life. I have moved away from that though, inspired by blogs such as Iain’s, where personal thoughts and feelings are mixed with technical observations. I would like to think that this isn’t a bad move; after all if potential employers come to look at this 5 years from now, and don’t like what I’ve done here, then I probably don’t want to work for them anyway. There is the argument that blogs should be ‘themed’ or targetted towards a particular subject to garner followers, and that too much sharing is possibly a bad thing. However, my current thoughts are that dry techncial info is boring, and I’d rather mix it with other things that are important to me.
With that said.. 2015 was an eventful year, some things were awesome, some not.
The “Not Awesome”
My mum started treatment for cancer, which is a non-curable kind, Myeloma. The treatment was a success and she is currently in remission for the time being, so that is a good thing, but how long she will stay in remission we do not know. Both my remaining grandparents also sadly passed away. I also split up with my girlfriend of 5 years, which was difficult and still haunts me to a certain degree.
The “Awesome”
The money that my parents were going to put towards the wedding of the ex-girlfriend, they gave to me so I could put a deposit down on a house. So in August I bought and moved into a house in Withington, which I am in the process of doing up. It is incredibly cheap to buy in Manchester compared to the south-east of England, where I’m originally from, where the dream of having my own 3 bed, semi-detached house would not be possible in any area with a reasonable number of IT jobs in short distance. I don’t drive, so the fact that the tram stop is 10 minutes walk away is great for getting to work.
I met my current girlfriend, Conny in May, and things seem to be going very well; she is even planning to move from Berlin to Manchester to live with me. This is obviously great, and I don’t know where I would be without her support.
Work
With all these things happening in my personal life, work took a secondary focus as I got things sorted. It also made me rethink what I wanted from my career. At the start of 2015 I had a new role, as Test Manager; the first level of technical management in my area at the BBC, and a big career move for me. Although I liked some aspects of the management role, I missed the technical challenges that had pretty much characterised the last 10 years of my career. There was not much direct coding, and I felt I was in danger of losing that aspect of my work. I took a 6 month attachment to R&D, which had me working in an extremely challenging technical role, on a HTML5 360 VR engine. In April when this attachment ends, I am looking to continue in a technical role of some description, and not return to pure management, at least for the meantime.
Work Goals
Creative Goals
Social Goals
Financial Goals
Health Goals
<
ul>

So, I have totally bought in to the home automation craze that is currently ‘the next big thing’ in the technology world in 2015. Apple has released iOS 9 with their HomeKit home automation framework, Google have the Nest series of smart devices, and there are numerous emerging competitors and hundreds of devices out there right now that will network together in your home.
For the uninitiated, a ‘virtual assistant’ is a cloud-connected voice processing system which you can ‘talk’ to. This is how a voice assistant essentially works:
1. You speak into the device. Your device will record what you’ve said, and send it to the cloud.
2. In the cloud, sophisticated and adaptive voice recognition software analyses what you’ve said and converts it into text.
3. The text command is run on a server somewhere, for example the command, ‘what is the weather today?’ will fetch the latest weather report for your area and summarise it.
4. The summarised report is converted into speech and streamed back to your device.
Apple have Siri, Microsoft have Cortana, Google has Google Now and Amazon have Alexa. These are all voice assistants which utilise the power of big data and machine learning over millions of requests to improve their own accurately.
The more people use virtual assistants, the better they get. Apple have been really pushing Siri, including it in the Apple Watch and most recently the new Apple TV. Not necessarily because it’s what people want *now*, but because they are banking on enough people using it so it snowballs into the lead, vastly improves in functionality, and becomes ubiquitous in the home, maybe 5-10 years down the line.
Apple’s Siri has reported a 40% reduction in errors recently, meaning only 5% of the words it processes, on average, are misread. This clearly can, and will, improve as more people use it.
The speech recognition capability in Siri now has a 5 percent word error rate, thanks to a 40 percent reduction on the part of Apple, Craig Federighi, Apple’s senior vice president of software engineering, said today at Apple’s 2015 Worldwide Developers Conference in San Francisco.
Amazon, meanwhile, has the ‘Alexa’ virtual assistant, which seems to have most use in home automation. Although Siri is linked in with Apple’s ‘HomeKit’ automation standard, HomeKit-enabled devices are only just now starting to be released, and reliability is currently a problem. Meanwhile, Google have concentrated on providing a small number of reliable devices in their Wi-Fi enabled ‘Nest’ series. Google’s Nest Thermostat has recently integrated Amazon’s Alexa virtual assistant to recognise speech commands such as ‘turn up the temperature to 20 degrees’.
What a lot of people are saying is the ‘killer app’ for virtual assistants is the handsfree speaker and microphone unit ‘Amazon Echo’. Amazon Echo is a small unit with a highly sensitive microphone and speaker, which sits in your living room and you can ‘talk’ to it, just like you would with Google Now or Apple’s Siri. The best thing about Amazon Echo is that it can talk to other smart home devices, such as the popular Phillips Hue lights, the Nest thermostat, various security cameras. It also integrates with the site IFTTT.com which is like a giant patchbay for smart devices, allowing you to connect them together and cause a state in one device to trigger an action.
So you can be sitting in your living room, and say ‘Dim all the lights in the house’ and Amazon Echo will do just that.
Unfortunately though, due to the fact that it uses Microsoft’s Bing search and doesn’t give you an option to choose a different search engine, it is not legal to sell the Amazon Echo in the UK due to a non-competition covering search engines in EU law. Therefore there is still an open gap in the market for this type of product, one which Apple’s HomeKit and Siri integration is racing to fill. However the closed nature of the HomeKit world means that it is likely that it won’t integrate with the non-Apple setup of Google Nest and others.

Whether you agree with Myers-Briggs personality profiling or not, like fellow BBC’er Ian Forrester I have found them a useful frame of reference from which to discuss my personality, because I see similarities between my perception of me, and the classification.
I took the Myers-Briggs personality profiling, and it has labelled me on several occasions an INTP:
INTPs are marked by a quiet, stoic, modest, and aloof exterior that masks strong creativity and enthusiasm for novel possibilities. Their weaknesses include poor organization, insensitivity to social niceties, and a tendency to get lost in abstractions. Keirsey referred to INTPs as Architects, one of the four types belonging to the temperament he called the Rationals
…
I – Introversion preferred to extraversion: INTPs tend to be quiet and reserved. They generally prefer interacting with a few close friends rather than a wide circle of acquaintances, and they expend energy in social situations (whereas extraverts gain energy).
Is this bad news for me? Introversion can be seen as a negative in today’s hyper-communicative world, especially for a team-based work environment. However I don’t think it need be a problem in an organisation that prioritises abstract thinking and creativity, because introverts are often very strong in both. The technology and R&D side of the BBC, I would argue, is such an organisation.
I know a few people from Imperial College London, one of the top universities in the world for Computer Science (and Science Technology Engineering and Medicine in general) and have found it full of technically gifted introverts. Now, I didn’t go to Imperial myself, but it does seem that there is a correlation between introversion and high amounts of technical ability. I have found this also with a lot of software engineers that I have worked with.
I am not saying necessarily that all good software engineers are extreme introverts, in fact I would say that this is untrue in a number of cases. This is because Agile software engineering often uses techniques such as pair programming from Extreme Programming, and it helps to have extroversion when dealing with hyper-social practices such as programming as a pair every day all day (which I have done, and found it very draining).
In fact, I have noticed that technical ability is less important than your ability to work in a team at the BBC. I generally have fairly good social skills and tend to like introverts so I personally have not had a problem with dealing with people who were very introverted but were technically quite brilliant. However it was clear that these types of people just didn’t seem to fit in quite as well in BBC teams with high collaboration aspects. I think this may be down to cultural fit rather than something we can extrapolate over all software engineering organisations.
Indeed, aside from my anecdotal evidence, in the book ‘Making Software’ Jo E. Hannay analyses the academic research on what type of personality programmers have, and what effect this has on their work. She writes;
We found that programmers deviated from a reference group in that they are lower on Extraversion, lower on Emotional Stability, and higher on Openness to Experience [Hannay et al. 2010]. See also [Moore 1991], [Smith 1989], [Woodruff 1979], [Capretz 2003], and [Turley and Bieman 1995] for related results. Programmers are also more homogeneous than the population as a whole; that is, programmers vary less in personality than do people in general.
So programmers tend to be introverts. Not really hugely suprising is it? However, she also notes:
We investigated .. in the context of 198 professional programmers pair programming over one day [Hannay et al. 2010]. We found that personality was a weak predictor of pair programming performance. Even crude measures of expertise, task complexity, and even the country in which the programmers where employed had greater predictive power than personality. The study also included an analysis of personality on individual programming and whether the effect on performance of pairing up had anything to do with personality. Again, expertise and task complexity are stronger predictors than personality.
Therefore an introverted personality is a poor predictor of pair programming performance across the industry. She goes on to say:
In ethnographic studies focusing on personality issues and disruption in software engineering team collaboration, it was found that disruption is bad, but lack of debate (which is a mild form of disruption) is worse [Karn and Cowling 2006], [Karn and Cowling 2005]. It is argued that pairs or teams with personalities that are too alike will lead to lack of debate. This finds empirical confirmation in [Williams et al. 2006] and [Walle and Hannay 2009]. In particular, differences in Extraversion has the largest effect: pairs whose peers have different levels of Extraversion collaborate more intensely (that is, engage in more discussion) than those with more similar levels.
She is saying that a pair of extroverted and introverted personalities collaborate more strongly than a homogenous pair. To me, this is good evidence that introversion and extroversion have their place in modern software development teams across the industry, and both types of personality should be culturally valued for collaboration, not just extroverts, even at hyper-collaborative organisations such as the BBC.

I’ve finished my 6U Eurorack case. It took me 9 months to build, buying a couple of modules a month.
I wanted to make a self-contained dual voice synthesizer that would interface with my 2x Doepfer Dark Energy MK1s and my Microbrute, on a budget. I also wanted to add some random sound generation features.
I chose to make the synthesizer out of Doepfer modules because they are easy to find cheap second-hand, and also because they are well-engineered. (If they’re good enough for Kraftwerk, who am I to complain?)

I love filters.. so I got quite a few!
Some things I have been meaning to investigate in my own time, but haven’t, because life just gets in the way.
– It might surprise a few people that, as a software developer, I never took maths to A-level. I picked up a bit of maths in my CS degree, but I never really got a firm grounding in it. This has prevented me from understanding and coding advanced stuff in game development, understanding audio to a decent level, and generally doing things in which I consider the more interesting fields of computing.
– I have been getting better at playing the piano/keyboard by ear, but I have never fully learned to read music, and I would like to.
– I would love to be able to build simple DIY synthesiser module kits for my Eurorack setup. I imagine I’d have to start on something small though.
It would be great if I could take courses in these subjects, via the OU or something similar. I just have to find the time.

Now that I am midway through the year, I thought I’d revisit the goals I set myself at the start of the year, to see what has changed.
Although I’ve achieved the majority of my goals, I haven’t achieved two of the major goals – around my job and around exercise, which are both things I need to work on. There is still time left this year to make a difference in these areas.
![]()
Two Ruby gems that I contributed to from my days in the BBC’s TITAN (Test Tools and Infrastructure) team, have been open-sourced. So finally I can say that I have made proper open-source contributions. The gems are for making automating of Android phones via Android Calabash easier, and are used in a lot of the mobile testing we do at the BBC. Here they are:
https://github.com/bbc/device_api
https://github.com/bbc/device_api-android
Here is my Github profile, which doesn’t look very active on the surface, but I have been contributing to repositories which remain private at the moment, so my history is not visible.
I have a lot of different instruments, both hardware and software, for making music, but here is what I use the most at the moment:
Piano
I have an actual electric piano but I don’t use the onboard sound engine, preferring to use it as a midi controller for a software piano sound. Recently I bought Ableton Live Full Suite, before I was using the ‘Grand Piano’ sound from the default install. Now there is a whole ‘Piano’ Ableton Live pack, and that seems to offer much more realistic piano sounds.
Drums
Lately I’ve been using the Sonic Charge’s Microtonic for drums, because I have been making more dance-orientated music. I find the drums really good, and they’re already fully processed with effects so you can just slot them into the mix. I also have been using the built-in Ableton 909 kit sound a lot, but might move away from that as I don’t like the sound compared to Microtonic. At some point in the future I will probably get my Nord Drum hardware drum synth out, but for now I can’t find the power supply so it’s not working.
Synth
I have been using my modular and semi-modular synthesizer as a main bassline synth, with some sounds from Ableton over the top. I have used the Access Virus synth quite a bit for synth duty, and it has some great presets for evolving arps.
Specs

I have finished filling the top half of my Eurorack case, see above. Here is a list of modules:
Next Moves:
Usage

My (mostly) Doepfer Eurorack is hooked up to my Microbrute, 2x Doepfer Dark Energy MK1s and my ZED-10 recording mixer.
The Microbrute acts as a pitch and gate out keyboard controller for all the synths and a semi-modular synthesiser in its own right with its patchbay.
The Doepfer Dark Energys are complete synth voices with a fair amount of input/outputs for modulation. They are hooked up to the pitch and gate out from the Microbrute via the Buff Mult and the Multiples on the Eurorack.
One configuration that I often use when composing music, is wire the Eurorack, the Dark Energys and the Microbrute into the ZED-10 mixer, tune each so they all play together, and create one massive analogue 5-osc synth mono voice which is great for devastating basslines, and I can modulate with the LFOs and envelopes in the system. I can then program a sequence into the Microbrute and transpose it when I play notes down on the Microbrute keyboard, or control it via the USB IN from Ableton.
Another configuration which I find interesting is patching the output of the Noise Generator/Random through the Quantizer. This results in random musical notes played by the oscilator, and you can create interesting pattern or arpeggios created solely by the Euroack without human input. I like the idea of generative music, and will be buying more modules to create more interesting computer generated randomness and music.
I am putting together a small modular synthesiser setup. Modular synthesizers are synthesizers composed of small individual modules, which are wired up to create a circuit for producing sound. They were very popular in the 1970s, with big bands such as Emmerson, Lake and Palmer, Kraftwerk and Jean Michael Jarre all owning big modular setups:

Modular synthesisers have had a resurgence in recent years with modern versions becoming available. One producer of modular synthesiser modules is Doepfer, a German company who’s modular synthesizer standard ‘Eurorack’ has become very popular recently. I have decided to build a small Eurorack modular, here it is so far:

The blank plates are spaces for modules that I haven’t bought yet, I am slowly accumulating them. I have currently been wiring my modular setup to my ‘semi-modular’ synths. They include the Microbrute, and 2x Dark Energy MK1s synths, shown below:

A semi-modular synth is a similar to a standard synthesizer, where all the synthesizer functions are self-contained in one case e.g. they are not just lots of modules. A semi-modular synth will work in its own right, without any additional wiring required. However, a semi-modular synth also has inputs which allow you to optionally wire up the semi-modular synth to other modules and semi-modular synths. So, it allows you to make one big sound processing circuit with all your synths wired together. Which is what I’ve been doing:
So, not quite Keith Emerson, but it’s a start! But why would you do this, I hear you ask. What possible reason would you have for wiring up synthesisers in this manner? Well:
Updated: Reorganised, replaced Tiamat headset for KAVE.


I use my computer a lot, for work (software development), gaming and music production. I wanted to build a high-end computer setup, as I’ve always lagged behind with upgrades before. So I gradually have been accumulating and swapping bits around to make the setup above.
Internals
Visual
Audio
Peripherals

This was an expensive case, but I wanted to spend some money to get a quality case that I could use for future builds. It has many fans, most of which I don’t need, but they are very quiet and they make the CPU temperate a very cool 30-40 degrees, under regular load, even in the current heatwave we’re having. The case has 5 hotswappable hard drive caddies which is very nice and allows me to easily install and remove hard drives without having to take apart the computer. It also has a lock, USB3 ports and enough clearance for graphic cards and space for lots of upgrades.

This was bought because it was a cheapish seat for the Ivy Bridge processor and the 16GB RAM. It has some niceish features, such as the fancy 3D BIOS which you can navigate with a mouse, and the onboard graphics which is enough to get into the BIOS when your graphics card isn’t working. The onboard sound is best avoided.

This was the processor that was the top of the mainstream mid-high end CPUs when I was purchasing. It differs from the 3770k as you can’t overclock it, but it has decent support for hardware virtualisation, which I wanted and is not available in the 3770k. I figured I wouldn’t miss the chance to overclock this for a good while, as CPUs of this type already are vastly overpowered for the applications that I use. CPU utilisation for typical use (not including games) rarely rises above 10%.

This is a bit overspecced since I am not planning to overclock, but I don’t like stock heatsinks and so bought this. It is a huge heatsink and probably wouldn’t fit in many other types of cases, but as I have a full tower it’s fine.

This is fast RAM for gaming. 16GB is a bit overspecced for my current needs, but it’s the maximum my board will take, and means I won’t have to upgrade for a long while.

This wireless card is good because it has dual-band, meaning faster, interference free 5GHz spectrum access to my dual-band wireless router, and because it has three external ariels which you can replace. I have got a large indoor antenna replacement which allows me to double my wireless range, meaning I can pick up local wifi hotspots if needed.

I didn’t really need a Blu-Ray burner, but it’s useful for backups and I thought I could write some discs to be played in my PS3. It has a very fast read speed for reading Blu-Rays and burning DVDs. To be honest I could have gone for a Blu-ray reader and DVD writer combo and not really noticed the difference.

850W allows a lot of headroom for graphics cards’ power requirements, and extra components in the future. It is a good quality PSU and is fully modular which is a lot nicer to work with.
1x Crucial CT256M4SSD2BAA 256GB SSD
1x Unknown model Crucial 120GB SSD
1x Seagate 3TB 3.5 inch 7200RPM 64MB Cache SATA3 Hard Drive


The 256GB SSD is my system drive, the older 120GB SSD is for games, and the 3TB HD is for storage: my music collection, video files collection, backup images and virtual machines. Being SSDs, the 256GB and 120GB drives are totally silent, making the 3TB HD sound really loud when it spins up. However, the 3TB drive has enough space to store full Blu-Ray ripped files.. not that I would do that, of course 🙂

This is a high-end 1440p 32″ monitor. It has made such a big difference to using the PC, more screen space, more pixels and better clarity. I was considering a 4K monitor, but don’t think the technology is quite cheap enough yet, and the software and games support is severely lacking. It’s 60HZ refresh rate, but that is enough for me. I have heard that the higher refresh rate monitors are better for gaming, but a 144HZ 1440p 32″ monitor would be way out of my budget, not to mention the graphics processing power it would require to run.

I had to upgrade my old Nvidea GTX 660TI, and just went for the absolute maximum I could afford. The STRIX 980 is an amazing card and comes slightly overclocked compared to the reference model. It plays all current games on maximum settings on 1440p at over 30FPS, which is no a mean feat, on my resolution there is more than a million pixels being drawn to the screen on each frame.

This is a monitor or TV backlighting kit that changes the colour of the light projected behind your screen to match the colours on the edges of your display. This provides a more immersive experience when playing games with the lights down, and you can also set it to become a graphic equaliser where the lights flash in time with the music. I bought this on a whim and I’ve been quite impressed with it so far. It definitely adds to immersion and the graphic equaliser mode is rather trippy when writing or playing music.

These are what I use when I can’t use my speakers. I bought them for DJing and audio work. They have great sound isolation (these are used by sports commentators you see on TV, because when you’ve got them on, you literally can only hear what’s coming through the headphones) and great sound quality (a favourite for top DJs and sound engineers). They don’t look that great though, and aren’t the most comfortable, but whatever. One nice feature is that they are designed for heavy use and are almost indestructable. If someone steps on the headphone lead, they won’t break, the cables will just pop out of the cans. If the headset breaks, well you can remove the cans and just buy a new headset. They have high ‘sound pressure’ which means the ratio of sound that enters your ear versus the amount of sound that comes out of the cans, is quite high due to their closed nature and sound isolating design. This, combined with high frequency range and a large volume range, means it’s quite easy to cause yourself hearing damage if you have them on too loud usually, or if you have a temporary high volume ‘spike’.

Good 7.1 surround sound card, with headphone amplifier.

It is quite difficult to find surround sound headsets with analogue inputs, most headsets are USB only, and contain their own soundcard. This is not ideal when you have a really good soundcard already that you want to use, such as my Xonar Phoebus Solo. Previously I was using the Razer Tiamat, which was terrible. It had a consistant high-pitched electrical whine when you were wearing the headset, and you couldn’t get rid of it. The Kave is much better in this regard, and is more comfortable too. It is ‘only’ 5.1 compared to the Tiamat’s 7.1, but really, 7.1 surround sound in a headset is just a marketing tactic anyway, you are never going to be able to appreciate the extra two channels when the speakers are that close together.

These are great monitors, which I use for music production, and make for great speakers for general use as well. They are a little large for my desk and have a maximum volume which is far too loud for my flat, but I wouldn’t be without them.

These are sound-isolating speaker stands, which I have setup to raise the speakers to ear height. I have to say, they’ve made the speakers sound so much better, and they look good too.

This is a good recording mixer which also doubles as a great USB soundcard. It has 4x mono RCA inputs and 2x stereo RCA inputs, which is enough to wire all my synths up, as well as feed the Rokit 5s.
<a href="http://www.davidcraddock.net/wp-content/uploads/2014/
This is a 50’s style microphone that I liked the look of. I got it because I wanted a microphone that plugged into my mixing desk, which would allow me to talk hands-free on Skype. Also it is good for streaming games, as I can mix my voice in the microphone with the output the computer game sounds, and send both mixed to skype or Twitch.TV or wherever. It is also moderately useful for recording voices for music production and for routing via my FX pedal for some novelty vocal effects on Skype, such as delay, echo and reverb.

I use a webcam for Skype often, and I want to get more into recording for YouTube, so I bought a good quality HD webcam.

This is the model with the quieter Cherry MX Brown key switches. It is a good mechanical keyboard for all purposes, looks good, and will encourage me to type more accurately. I grew annoyed at missing keys on the blank keycaps, so I added my own coloured keycaps for high visibility (see picture at top).

This is the ‘Stealth’ model with the Cherry MX Brown key switches. I was initially doubtful whether it was worth getting a gaming keypad, but so many people have recommended it, that I had to try it out. I actually have found it very useful, much more comfortable and accurate than using a normal keyboard for gaming. It also forces you to get into the habit of remapping keys for your own preference.

I upgraded from my G500 mouse to this, smaller, G9X. I have started to adopt the claw grip for gaming and generally using my mouse. This makes the larger G500 difficult to use, as the larger size means that the mouse buttons don’t click properly when you have your fingers higher up on the mouse. So far, I am very happy with the G9X, the higher DPI scanning, and the easier to grip ‘precicse grip’ material means that it is better for other reasons for me.
I use the Corsair Vengeance mouse matt, it is made of metal unlike my previous Razor Golliathus cloth one, which I didn’t like because the edge of the matt would get stuck in the mouse when you moved it too far.
I use the excellent http://www.smartsvn.com/ client from WANdisco. WANdisco have been releasing new open-source versions of SVN to the public with new improved reliability, and the client uses one of these versions, 1.7, to offer better performance.
Unfortunately if you choose to upgrade your entire repository to 1.7, this breaks compatibility with the default commandline SVN client on Waldorf which I like to use as well as Smart SVN, for quick ‘svn up’s and other commandline magic.
This means I have to download the latest commandline SVN client, the 1.7 version of subversion for Linux, available for free on the WANdisco site.
Unfortunately, you can’t install this version on the version of Debian that Crunchbang Waldorf is based on. There are broken dependencies on an old version of libsvn1, which is a requirement for another package that is part of the Debian base install.
Eventually I found this really helpful page, the instructions which will work 100% on Waldorf:

iTerm is much better than the standard OSX terminal client, not least because it has compatiablity with xterm256-color terminal emulation. xterm256-color emulation will give your terminal access to 256 colours instead of the usual 16. Much better, not just for looking pretty, but for distinguishing between different types of data in an editor like VIM or even in Cucumber output (see picture above). It’s also free.
Once installed, you will have to go in to the preferences and set your ‘Report Terminal Type’ to be ‘xterm256-color’. Then things should be more colourful. Then install a 256 color compatible theme in VIM to make use of that extra capacity. You can also edit your prompt and use 256 colour escape sequences, if you wish.
Lately I’ve been thinking about making a Flash game or application. Although I haven’t made one yet, my current understanding is that most projects of this type require a lot of artwork.
I found this article, and was impressed at the quality and the resources mentioned: http://freelanceflashgames.com/news/2009/03/25/the-big-guide-to-hiring-an-artist/
I’m going to take a break from the purely technical posts to get more people to see this video. Here the late Dan Osman speed-climbs a cliff without any safety equipment.
http://www.youtube-nocookie.com/v/Fpm0m6bVfrM&hl=en&fs=1&rel=0
Risky? Just a bit. A few years later he lost his life during a similar attempt. But no-one can doubt the guts required, and the level of skill he achieved, in this type of climbing.
